 MyMath
Contents
- 1. What MyMath is
- 2. Install
- 3. Your first equation in 5 minutes
- 4. Four ways to place an equation
- 5. The editor window
- 6. Writing equations — a hands-on tour
- 7. Korean textbook notation
- 8. Vertical position
- 9. Working with a whole document
- 10. Preferences
- 11. Import and export
- 12. Print quality
- 13. Keyboard shortcuts
- 14. Troubleshooting
- 15. What it cannot do — honestly
- Appendix. The complete palette list
1. What MyMath is
MyMath puts the equations in your manuscript onto the InDesign page at print quality. Equations are placed as vectors, not pictures, and black is a single K plate, so the pages can go to the printer as they are.
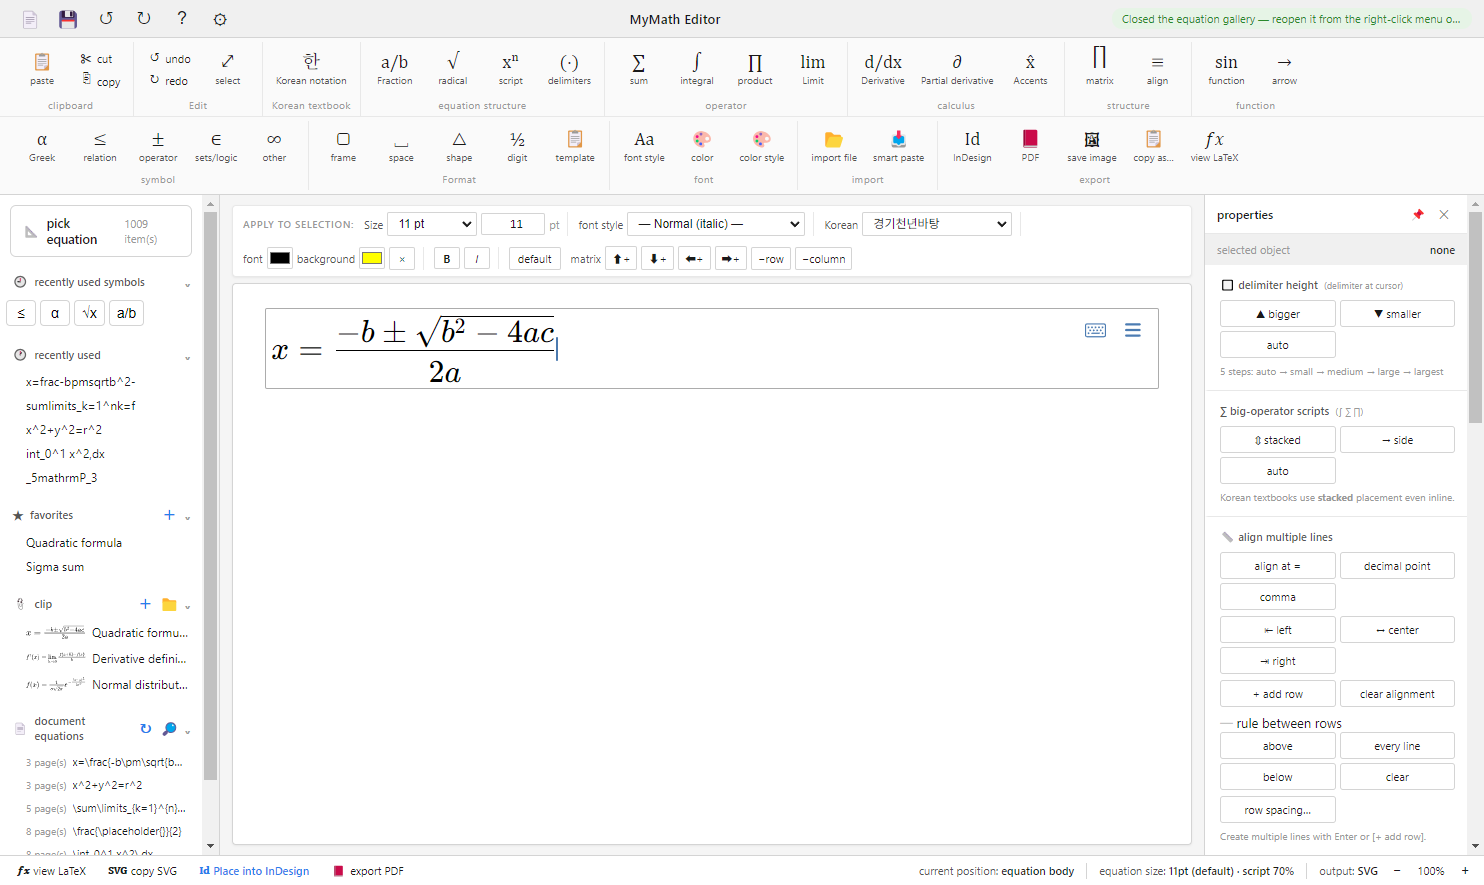
It comes in two parts
| InDesign panel | The control desk: place equations, edit them, and work on the whole document. It lives inside the InDesign window.
Menu [Plugins] → MyMath → MyMath Equations |
|---|---|
| Equation editor | A separate app where equations are actually built. The panel opens it automatically when needed.
You can also keep it open while you work |
The two talk to each other through an exchange folder (Documents\MyMath\exchange).
The panel finds and connects to this folder by itself — there is nothing to set up.
What you can do — at a glance
| You want to… | In MyMath | Where |
|---|---|---|
| Place one equation quickly | Type in the panel's quick-insert box → Enter | 4.1 |
| Build a complex equation | Compose in the editor with palettes and shortcuts | Ch. 6 |
| Convert hundreds of equations in a manuscript at once | Write them as $…$ and click one button | 4.3 |
| Edit an equation already placed | Click the equation → [Edit Equation] | 4.4 |
| Apply a size or typesetting rule to the whole document | Change the settings, then [Re-render all equations] | Ch. 9 |
| Review only the equations while proofreading | [Send list to editor] plus the proofing check | Ch. 9 |
| Write in Korean textbook notation | The ribbon's first group, "Korean textbook" | Ch. 7 |
| Bring in equations from other programs | MathML · Word · AsciiMath and more, detected automatically | Ch. 11 |
| Get an equation out as a picture or PDF | SVG · PNG · PDF · EPS · WMF | Ch. 11 |
| Prepare files for the printer | K100 · spot color · overprint settings | Ch. 12 |
What kind of tool this is
- No fonts to install. Equation glyphs are drawn as outlines (shapes), so you never have to send fonts to the printer or a contractor, and no "missing font" warning ever appears.
- No sidecar files. The equation goes into the document, and its source (LaTeX) is stored in a label on the same frame. With the document file alone you can re-edit at any time. There are no links to break.
- The source stays as plain text. An equation's source is LaTeX text, so it is easy to move to another tool later, or to search and replace.
- Korean textbook notation is supported. Permutations ₙPᵣ, repeating decimals, similarity ∽, parallel // and more, compiled from the list of symbols in Korea's national mathematics curriculum.
- Equation size follows the body text. Next to 9 pt body text the equation is built for 9 pt; next to an 18 pt heading it is built for 18 pt — automatically.
- It is free.
What you need
| Operating system | Windows 10 or 11 |
|---|---|
| InDesign | 18.5 (August 2023) or later Earlier versions have no plugin-panel feature at all, so MyMath cannot run in them |
| Also | The Adobe Creative Cloud desktop app (used to add the plugin) |
Folders MyMath uses
Everything is created under Documents\MyMath\. Keep this in mind for backups or for sharing with your team.
exchange\ | Temporary files passed between the panel and the editor. You never need to touch these |
|---|---|
Clips\ | Equation snippets you use often. Share the whole folder and your team uses the same snippets |
StyleSets\ | Bundles of typesetting settings. Share the folder and everyone's typesetting matches |
mmf-symbols.json | Your own symbol table for imports (you can extend it yourself) |
2. Install
One installer sets up both the editor and the InDesign plugin. There is nothing to configure.
2.1 Run the installer
- Double-click
MyMath-Setup.exe. - It installs without asking anything. The InDesign plugin is added automatically along with the editor.
- When it finishes, the editor opens once and a MyMath Editor icon appears on the desktop.
2.2 Open the panel in InDesign
- Start InDesign (if it was already running, quit and start it again).
- Choose [Plugins] → MyMath → MyMath Equations.
- If the Folder box under "Connection settings" at the bottom of the panel already shows a path, you are ready.
The panel finds and connects to the exchange folder (Documents\MyMath\exchange) by itself, and locates the editor automatically too.
2.3 First time only — [Allow]
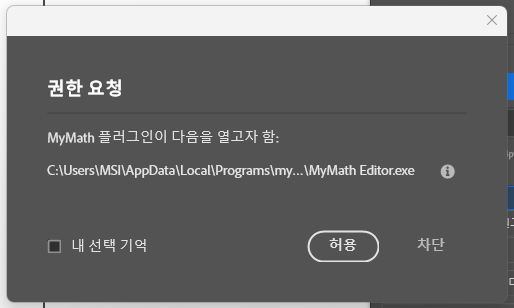
The first time you place an equation, InDesign asks whether the MyMath plugin may open "…MyMath Editor.exe". Tick [Remember my choice] and click [Allow]. It won't ask again.
2.4 Requirements
| Item | Requirement |
|---|---|
| InDesign | 18.5 (August 2023) or later. Earlier versions cannot run this kind of plugin panel. |
| Operating system | Windows 10 / 11 |
| Adobe Creative Cloud app | Used to add the plugin. If you use InDesign, you already have it. |
2.5 Updating · uninstalling
To update, simply run the new installer. The editor and the plugin are replaced together and your settings are kept.
To uninstall, go to Windows Settings → Apps and remove "MyMath Editor". The editor and the InDesign plugin are removed together. Equations already placed in your documents stay, and print exactly as before.
3. Your first equation in 5 minutes
This walk-through gets the whole flow into your hands. Follow it in order.
3.1 Placing an equation
- In InDesign, create a text frame and type
Quadratic equation. - With the cursor still there, type
x^2-5x+6=0in the panel's quick-insert box and press Enter. - A moment later the equation appears at the cursor.
x^2, 1/2, sqrt(2).
If you know LaTeX, you can type \frac{1}{2} as well.3.2 Editing the equation you placed
- Click the equation you just placed to select it. The panel shows that equation's details.
- Click [Edit Equation] in the panel. The editor opens with that equation loaded.
- Change the
6to an8. - Click [Id InDesign] in the editor, or press Ctrl+S.
- The equation is replaced in the same spot.
3.3 Building a longer equation
- Put the cursor in your text and click [Edit Equation] in the panel.
- Type
x=on the editor's canvas. - Ctrl+F (fraction) → type
-bin the numerator → Tab → type2ain the denominator. - [Id InDesign] — it goes into your text.
More ways to build equations are in chapter 6.
3.4 Deleting an equation
Delete it like any other character in your text. An inline equation behaves as a single character, so Backspace removes it.
4. Four ways to place an equation
Pick whichever fits the situation. The quality of the result is identical for all four.
| When | Method | Speed |
|---|---|---|
| One short equation | Quick insert — type in the panel → Enter | Fastest |
| A complex or long equation | The editor — compose with the palettes in view | Normal |
| The manuscript is full of equations | Convert $…$ in the manuscript — all at once | Most efficient |
| Changing an equation already placed | Click the equation → [Edit Equation] | — |
4.1 Quick insert — without leaving InDesign
Type in the input box in the panel's "Edit" section and press Enter. There is no trip to the editor window, so this is the fastest way. The editor renders quietly in the background, so the quality is exactly the same as an equation built in the editor.
| Type this | You get |
|---|---|
1/2 | ½ (fraction) |
x^2 | x² (superscript) |
a_1 | a₁ (subscript) |
sqrt(2) | √2 (root) |
(a+b)/(c+d) | A fraction (the parentheses disappear automatically) |
(-b+-sqrt(b^2-4ac))/(2a) | The whole quadratic formula |
sum_(k=1)^n k | Σ (sum) |
\frac{1}{2} | LaTeX works too |
4.2 Composing in the editor
- Put the cursor where the equation should go and click [Edit Equation] in the panel.
- Build the equation in the editor (see chapter 6).
- [Id InDesign] or Ctrl+S — it is placed at the cursor.
The editor reads the body text size at that spot and sizes the equation to match. The editor's status bar shows something like "fitted to body size: 9.5pt".
4.3 Converting $…$ in a manuscript — when there are many equations
Instead of placing equations one at a time, you write them into the manuscript in advance and convert them all at once. For work with hundreds of equations, such as a textbook, this saves a great deal of time.
How to write the manuscript
Wrap each equation in dollar signs. It is just plain text in Word, Hangul or anywhere else, so it transfers without trouble.
The solutions of the quadratic equation $ax^2+bx+c=0$ are $x=\frac{-b\pm\sqrt{b^2-4ac}}{2a}$.
The number of roots depends on the sign of the discriminant $D=b^2-4ac$.
Converting
- Flow the manuscript into InDesign — File → Place (Ctrl+D).
For Word or Hangul files, [Place manuscript] below is quicker. - Choose the scope in the panel's "Document" section (whole document / selected frame).
- Click [Convert $...$ equations].
- The editor opens automatically, builds the equations, and each spot is replaced in turn.
- When it finishes, the panel reports how many were placed, skipped and failed.
$…$" as a rule for manuscripts,
and the equation work disappears from the typesetting stage altogether.- Only
$…$on a single line is found. An equation that runs across a line break is not recognized. - To write a real dollar sign, put a backslash in front, as in
\$1,000. The conversion skips it. - Each equation is built for the text size at its own spot. Documents with mixed sizes just work.
For Word and Hangul manuscripts — [Place manuscript]
If the manuscript is a Word (.docx) or Hangul (.hwpx) file with equations inside it, you can flow it in and convert it in a single step.
- Put the cursor in a text frame.
- In the panel's "Document" section, click [Place manuscript (Word · HWPX)] and pick the manuscript file.
- The text flows in at the cursor, and the equations in the manuscript (Word equations, Hangul equations) become equation graphics automatically.
4.4 Editing an equation already placed
- Click the equation in the document to select it. The panel shows its details (content · size · body text size · vertical position).
- [Edit Equation] — the editor opens with that equation loaded. The editor's status bar shows "re-edit mode".
- Make your change, then [Id InDesign] — the same spot is replaced with the new equation. The surrounding text reflows naturally.
To go through every equation in a document, Send list to editor in chapter 9 is more convenient. You can open any equation for editing with one click in the list, without hunting through the document.
5. The editor window
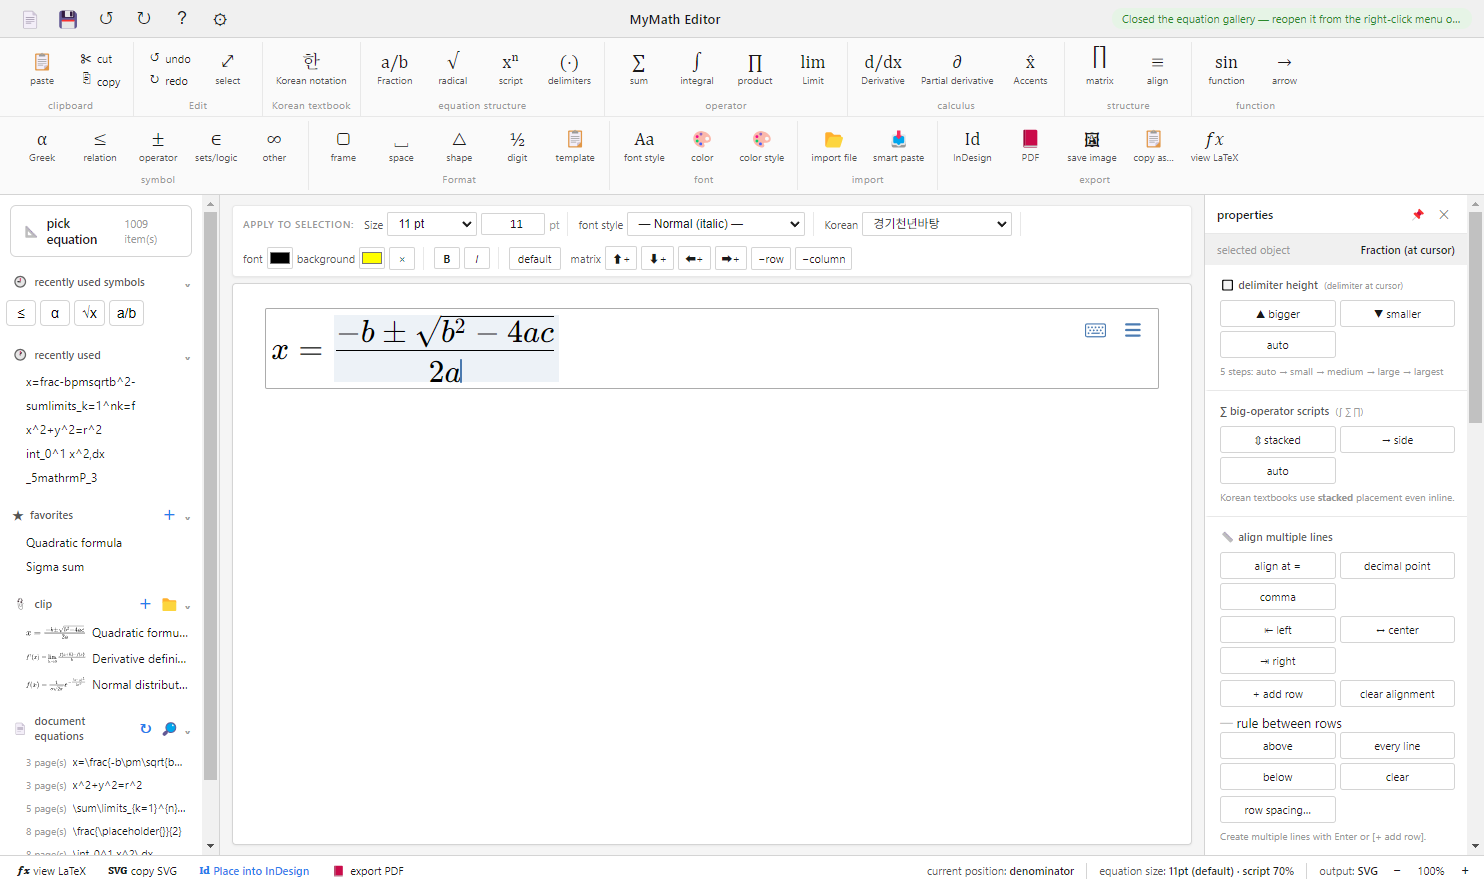
The MyMath editor window is divided into six large areas. This chapter explains, one by one, every button and display in those six areas. If you come across something on screen and do not know what it means, look up its name in this chapter.
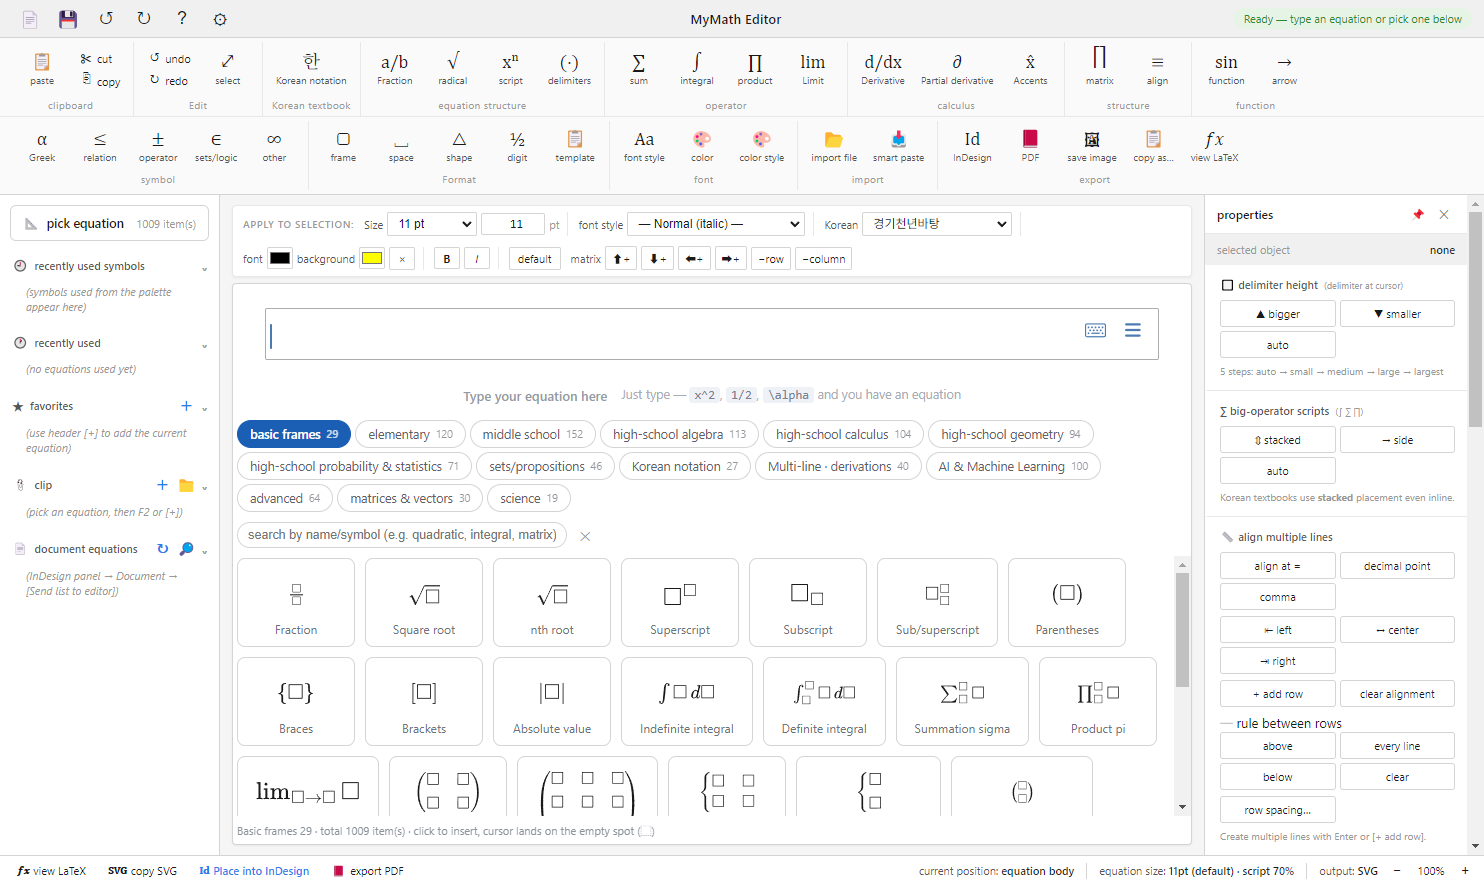
Overall layout
| Area | Where | What it does | Explained in |
|---|---|---|---|
| Menu bar | Top of the window | File · Edit · Format · View · Size · Window · Help — the route to every function | 5.7 |
| Title bar | Below the menu bar | The six most-used quick buttons + the status message | Just below |
| Ribbon | 2 rows below the title bar | Palettes for choosing symbols and structures, and the export buttons | 5.1 |
| Sidebar | Left | Pick equation · recent symbols · recently used · favorites · clips · document equations | 5.2 |
| Precision control bar | Just above the canvas | Applies size · font style · color · weight to the selection | 5.3 |
| Canvas | Middle | Where you actually type and edit the equation | 5.4 |
| Properties panel | Right | Fine adjustments to the object the cursor is in (fraction, matrix, delimiters…) | 5.5 |
| Status bar | Bottom of the window | Four quick actions + current status + zoom | 5.6 |
The title bar

| Button | Name | What it does | Shortcut |
|---|---|---|---|
| 📄 | New equation | Clears the canvas and starts a new equation. | Ctrl+N |
| 💾 | Place into InDesign | Places the current equation in the InDesign document. When re-editing, it replaces that spot. | Ctrl+S |
| ↺ | Undo | Undoes the last edit on the canvas. | Ctrl+Z |
| ↻ | Redo | Reapplies an edit that was undone. | Ctrl+Shift+Z |
| ? | About MyMath | Opens a small window showing the program name, version and components. | — |
| ⚙ | Preferences | Opens the typesetting settings: style sets · equation size · print color · spacing · typefaces and more. | Ctrl+; |
The status message at the right end of the title bar tells you, in one line, the result of what you just did. Insert a symbol from a palette and it says, for example, "inserted: square root (radical)"; after a wrong move it tells you what to do, as in "place the cursor inside the fraction to convert". If you clicked something and the screen did not change, look here first.
5.1 The ribbon
The ribbon has two rows, a top row and a bottom row, with a thin line between them. Each row is divided into several groups, and the group name is written in gray below the buttons.
There are two kinds of button.
- Large buttons — a glyph (a picture of the symbol) on top and the name underneath. Most of them open a symbol gallery.
- Small buttons — single-line buttons stacked vertically inside a group (cut, copy and so on).
What happens when you click a category button
- Click a large category button in the ribbon (for example
√ radical). - The symbol gallery window for that category opens. Each item is drawn in its real shape, and hovering over it shows a description.
- Click an item and it is inserted at the cursor in the canvas and the window closes.
5.1.1 The top row

The "clipboard" group
| Button | What it does | Shortcut |
|---|---|---|
| 📋 paste (large button) | Inserts the clipboard contents at the cursor. | Ctrl+V |
| ✂ cut | Cuts the selection to the clipboard. | Ctrl+X |
| ⎘ copy | Copies the selection to the clipboard. | Ctrl+C |
The "Edit" group
| Button | What it does | Shortcut |
|---|---|---|
| ↺ undo | Undoes the last edit. | Ctrl+Z |
| ↻ redo | Reapplies what was undone. | Ctrl+Shift+Z |
| ⤢ select (large button) | Selects the whole equation in the canvas. After selecting, you can give size, font style and color in one go. | Ctrl+A |
The "Korean textbook" group — only the items whose notation differs from international practice, gathered separately at the front of the ribbon.
| Button | What it does |
|---|---|
| 한 Korean notation | Opens a gallery of permutations and combinations (ₙPᵣ), repeating decimals, similar ∽, parallel //, vector arrows, the sequence {aₙ},
logarithm and set notation, ∑ and lim with stacked limits, notation containing Korean text and more. |
The "equation structure" group
| Button | What it does | Related shortcut |
|---|---|---|
| a/b Fraction | Opens the gallery of fraction forms (display, inline and small fractions, continued fractions and so on). | Ctrl+F (inserts a basic fraction directly) |
| √ radical | Opens the gallery of radicals: square root, nth root and so on. | Ctrl+R / Ctrl+Shift+R |
| xⁿ script | Opens the gallery of superscripts, subscripts, prescripts and so on. | Ctrl+H · Ctrl+L · Ctrl+J |
| (·) delimiters | Opens the gallery of parentheses, square brackets, braces, absolute value, norm and so on. | Ctrl+9 · Ctrl+0 · Ctrl+Shift+9 |
The "operator" group
| Button | What it does | Related shortcut |
|---|---|---|
| ∑ sum | Opens the gallery of sum signs and their limit forms. | Ctrl+Shift+S |
| ∫ integral | Opens the gallery of definite, indefinite, double and line integrals and so on. | Ctrl+I |
| ∏ product | Opens the gallery of product signs. | — |
| lim Limit | Opens the gallery of limit forms. | — |
The "calculus" group
| Button | What it does |
|---|---|
| d/dx Derivative | Opens the gallery of derivative and higher-derivative notation. |
| ∂ Partial derivative | Opens the gallery of partial-derivative notation. |
| x̂ Accents | Opens the gallery of marks placed over letters (vector arrow, hat, bar, tilde and so on). |
The "structure" group
| Button | What it does | Shortcut |
|---|---|---|
| ⎡⎤ matrix | Unlike the other buttons, this opens not a gallery but the "matrix wizard". Choose the number of rows and columns and the delimiters, then insert (see 5.1.3). | Ctrl+M |
| ≡ align | Opens the gallery of multi-line equations, cases and alignment environments. | — |
The "function" group
| Button | What it does |
|---|---|
| sin function | Opens the gallery of function names: trigonometric, logarithmic, exponential and so on. Function names go in upright. |
| → arrow | Opens the gallery of arrows of various kinds. |
5.1.2 The bottom row

The "symbol" group
| Button | What it does | Related shortcut |
|---|---|---|
| α Greek | Opens the gallery of Greek capitals and lowercase letters. | Ctrl+G then a letter |
| ≤ relation | Opens the gallery of relation symbols: equality, inequality, similar, congruent and so on. | Ctrl+K then a key |
| ± operator | Opens the gallery of operation symbols: the four operations, plus-minus, dot product and so on. | — |
| ∈ sets/logic | Opens the gallery of element, subset, union, intersection and logic symbols. | — |
| ∞ other | Opens the gallery of symbols that fit none of the above: infinity, degrees, prime and so on. | — |
The "Format" group
| Button | What it does |
|---|---|
| ▢ frame | Opens the gallery of items that box an equation or add underlines and cancel strokes. |
| ␣ space | Opens the gallery of spaces, from thin to wide. |
| △ shape | Opens the gallery of shape symbols: triangles, circles, squares and so on. |
| ½ digit | Opens the gallery of ready-set fraction numerals and superscript and subscript digits. |
| 📋 template | Opens the gallery of frames for commonly used equations. |
The "font" group
| Button | What it does |
|---|---|
| Aa font style | The place for typefaces. To apply a typeface to a selection, use the [font style] drop-down of the precision control bar (5.3). |
| 🎨 color | The place for color. For color, use the color boxes of the precision control bar or [color style] right beside it. |
| 🎨 color style | Opens the window where you create and manage named colors. Only the color name stays in the equation, so when you later change the value of a style, every equation using that color changes with it. Spot color and overprint are set here too. |
- The [Aa font style] · [🎨 color] palettes — insert a typeface or color frame at the cursor. The number-set symbols (ℕ ℤ ℚ ℝ ℂ) and boxes and background colors are here too.
- The precision control bar (5.3) — applies directly to the part you selected by dragging.
- [color style] — give colors names and manage them together across the whole document.
The "import" group
| Button | What it does | Shortcut |
|---|---|---|
| 📂 import file | Reads other equation files. It accepts .mmf .mmc .eps
.mml .mathml .xml .pdf .html
.txt .am, and tells the format from the file's contents, not its extension.
You can choose several at once, and at the end a report shows what was read and what was not. | — |
| 📥 smart paste | Works out by itself whether the clipboard holds LaTeX, AsciiMath, MathML or a Word equation and inserts it into the canvas. You do not have to choose a format. | Ctrl+Shift+V |
The "export" group
| Button | What it does | Shortcut |
|---|---|---|
| Id InDesign | Places the current equation in the InDesign document. The button you will click most in this editor. | Ctrl+S |
| Saves the single equation as a PDF file. A dialog asks where to save it. | — | |
| 🖼 save image | Saves as PNG · JPEG · GIF · BMP · WMF. You can choose the resolution (dpi) and the background. | — |
| 📋 copy as… | Shows several formats — LaTeX · AMS LaTeX · Plain TeX · MediaWiki · MathML · AsciiMath · SVG · read-aloud sentence and more — each with a preview, and sends the one you choose to the clipboard. | Ctrl+Shift+E |
| 𝑓𝑥 view LaTeX | Opens the LaTeX source box at the bottom of the screen. You can also edit it there and click [apply] (see 5.6). | — |
5.1.3 The matrix wizard
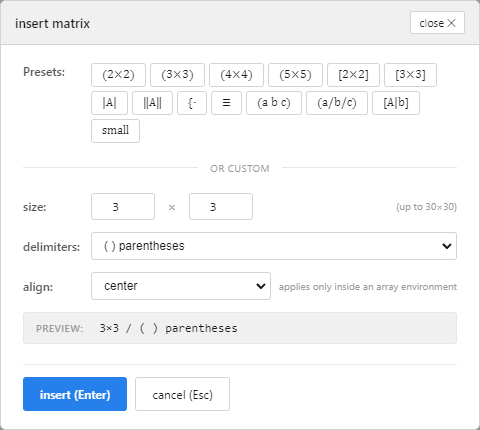
| Item | Description |
|---|---|
| Presets | A list of buttons for choosing a common matrix form in one click. |
| Size | Set the number of rows × columns yourself. From 1 to 30. |
| Delimiters | ( ) parentheses · [ ] square brackets · { } braces · | | absolute value (determinant) · ‖ ‖ norm · none · array (with alignment) — seven kinds. |
| Align | center · left · right. It applies only when the delimiters are set to array. |
| Preview | Shows in one line what matrix the current settings will give. |
| [Insert] / [Cancel] | Enter inserts, Esc cancels. |
Adding and removing rows and columns after inserting is done with the precision control bar (5.3) or "edit matrix" in the properties panel (5.5).
5.2 The sidebar (left)
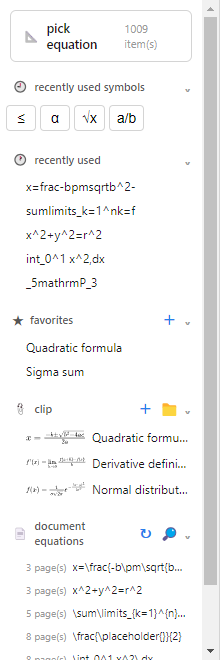
Click the title row of a section to collapse or expand it. Collapse the sections you rarely use and the screen feels much roomier. Clicking the small buttons inside a title row (+, 📁, ↻ and so on) does not collapse it.
5.2.1 🕘 Recently used symbols
Symbols you have just used from a palette gallery or symbol search line up as small pill-shaped chips. Up to 14 are remembered, and using the same symbol again moves it to the front.
- Click a chip to insert that symbol again at the cursor.
- In typesetting that uses the same symbols over and over, you do not have to find your way back into the category.
- Clips and characters you type are not recorded here. Only palette items are.
5.2.2 🕐 Recently used
Keeps up to 10 whole equations you have edited, most recent first.
- Click an item and the canvas content is replaced by that equation. (Unlike recently used symbols, which are inserted.)
- Hover over it and the full LaTeX source appears as a tooltip.
5.2.3 ★ Favorites
Saves equations you use often on this computer.
| Action | Result |
|---|---|
| [+] in the title row | Adds the equation now in the canvas to favorites. A name is given automatically from the content (fraction, radical, integral, sum, product, limit, matrix, binomial coefficient, scripted expression). |
| Click an item | Loads that equation into the canvas. |
| [✕] on an item | Deletes that favorite. |
If you add an equation that is already registered, it says "already in favorites" and does not store a duplicate.
5.2.4 📎 Clips
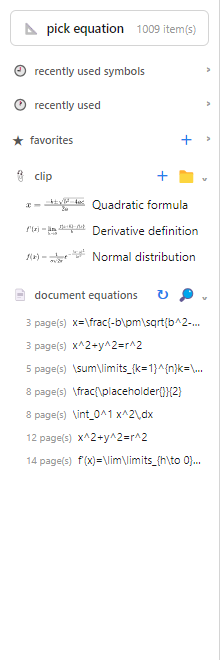
Clips are where you keep frequently used pieces of equations, named, as files. Where a favorite "replaces the whole canvas", a clip "inserts a piece at the cursor".
| Action | Result |
|---|---|
| [+] in the title row, or F2 | Saves only the selection if there is one, otherwise the whole equation, as a clip. A small window asks for a name, with a suitable name already suggested. |
| Click an item | Inserts it at the cursor. The rest of the canvas stays as it is. |
| [✎] on an item | Renames the clip. |
| [✕] on an item | Deletes the clip (the file is deleted too). |
| Drag an item | Changes the order of the list. The new order is written to file, so it is the same the next time you open the editor. |
| [📁] in the title row | Opens the folder where clips are stored in File Explorer. |
Clip files go one by one into the following folder.
~/Documents/MyMath/Clips/
Every item in the list comes with a preview drawn for real, so you are never left guessing from the name alone.
5.2.5 📄 Document equations
The section where you look over the equations in an InDesign document from within the editor, and click one to fix that spot directly.
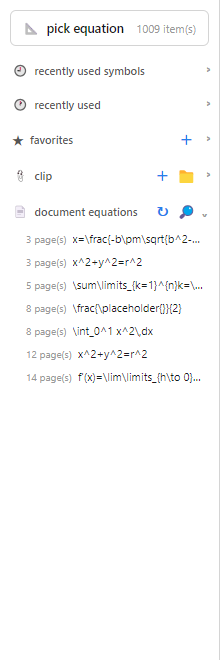
- In the MyMath panel in InDesign, click [Send list to editor] under "Document".
- The list arrives by itself under "document equations" in the editor's sidebar. If you do not see it, click [↻] in the title row.
- The list fills in. Each row shows the page number and the beginning of the equation.
- Click a row and that equation comes into the canvas in re-edit mode. Place it with Ctrl+S in this state and that spot in the document is updated.
| Button | What it does |
|---|---|
| ↻ | Reads again the list of document equations sent from InDesign. |
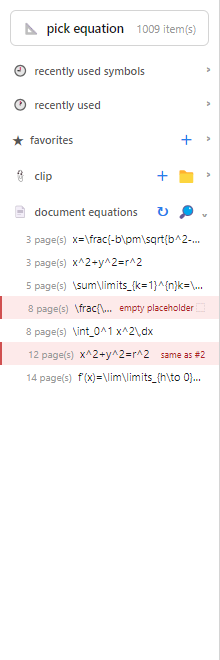
| 🔎 (proofing check) | Goes through every equation in the list and marks render errors · empty slots (⬚) · empty equations · duplicates. Rows with a problem are shown in red with a tag saying what the problem is. Useful at the proofing stage. |
5.2.6 📐 Pick equation
The button at the top of the sidebar. Click it and the equation gallery opens below the canvas — 14 families and 1009 equations, from the elementary to high-school curriculum through advanced and AI formulas, shown as cards drawn for real.
| Action | Result |
|---|---|
| Family tabs | Show only the cards of that family. Each tab carries its count. |
| Search box | Searches all families by name or symbol. |
| Click a card | Inserts it at the cursor and puts the cursor in the first empty slot (⬚). |
| [✕] | Closes the gallery. It remembers being closed the next time you start the editor. |
The gallery is already open when you first start the editor, and it does not close when you type an equation. The contents of each family are described in section 6.12.
5.3 The precision control bar

Size
| Control | Description |
|---|---|
| Drop-down | 15 common sizes — 6 · 7 · 8 · 9 · 10 · 10.5 · 11 · 12 · 14 · 16 · 18 · 24 · 36 · 48 · 72 pt. It starts at 11 pt. |
| Input box | Type a size that is not in the list. 1–200 pt, in steps of 0.5. Type the value and press Enter to apply it. |
Font style
Changes the typeface of the selected part. Choose from eleven.
| Item | Shape | Use |
|---|---|---|
| — Normal (italic) — | The default state | Removes a typeface you set and returns to the default. |
| 𝑥 italic | Slanted | The default shape of variables. |
| 𝒙 bold | Slanted + bold | Variables to emphasize. |
| x roman (upright) | Upright letters | Letters that are not variables: units, function names, abbreviations. |
| 𝐱 bold roman | Bold and upright | Common for vector and matrix notation. |
| 𝗑 sans-serif | Sans-serif family | — |
| 𝚡 monospace | Letters of equal width | Code, listings of numbers. |
| 𝕩 blackboard bold | Thick hollow letters | Number-set symbols (ℝ ℕ ℤ and so on). |
| 𝓍 calligraphic | Flowing capitals | — |
| 𝔵 fraktur | Blackletter | — |
| 𝒳 script | Script lettering | — |
When you change the typeface, the one that was set before is removed first and the new one applied, so they never nest.
Color
| Control | Description |
|---|---|
| font (color box) | Sets the text color of the selection. Click it and a color picker opens. |
| background (color box) | Sets the background color of the selection (use it like a highlighter). |
| [×] | Removes the background color. |
Bold · italic · default
| Button | What it does | Shortcut |
|---|---|---|
| B | Makes the selection bold. If it is already bold, click again to remove it. | Ctrl+B |
| I | Makes the selection italic. Click again to remove it. | Ctrl+Shift+I |
| default | Returns the color · background · weight · slant · size of the selection to their initial state in one go. | — |
The B and I buttons mirror the current state at the cursor. Put the cursor inside bold text and the B button looks pressed. The font style drop-down and the size display likewise follow the cursor automatically.
Matrix
Six buttons that work while the cursor is inside a matrix cell.
| Button | What it does |
|---|---|
| ⬆+ | Inserts a row above the row the cursor is in. |
| ⬇+ | Inserts a row below the row the cursor is in. |
| ⬅+ | Inserts a column to the left of the column the cursor is in. |
| ➡+ | Inserts a column to the right of the column the cursor is in. |
| −row | Deletes the row the cursor is in. |
| −col | Deletes the column the cursor is in. |
The same six are also under "edit matrix" in the properties panel (5.5) and under menu "Format → edit matrix". They all do the same thing.
5.4 The canvas
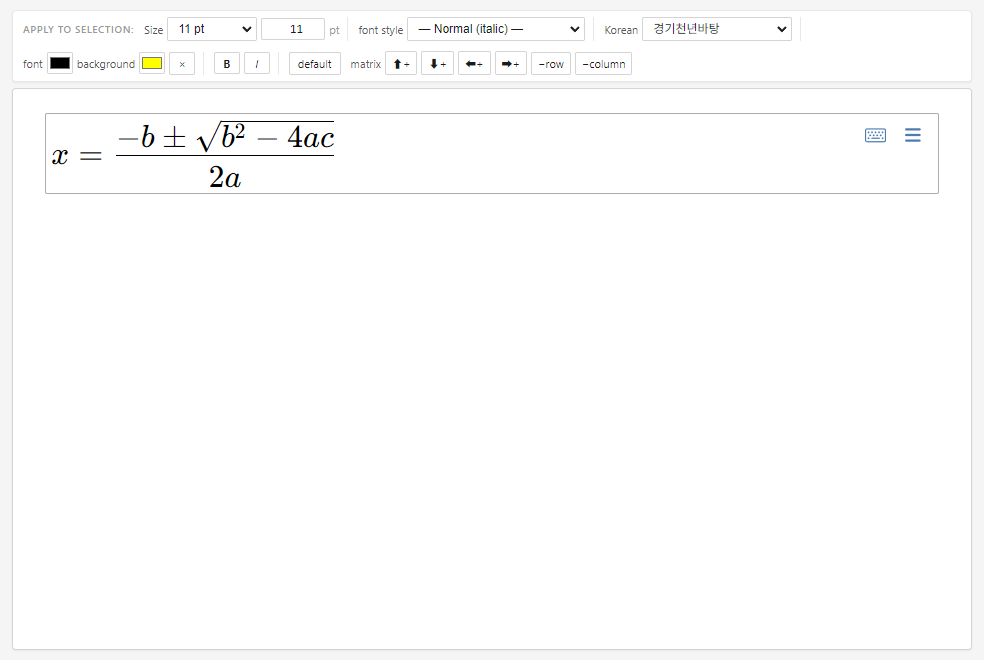
5.4.1 Ways of entering an equation
The canvas is an area where you edit what you see. You can mix the following methods.
- Typing — type
x^2and it turns into a superscript on the spot. - Ribbon palettes — category button → choose from the gallery (5.1).
- Symbol search — find by typing a name with Ctrl+/.
- Two-step shortcuts — Ctrl+G followed by a letter inserts a Greek letter, Ctrl+K a symbol, Ctrl+T a Korean-notation structure. Pressing the first key brings up the assignment table at the bottom of the screen, so there is nothing to memorize. Esc cancels.
- Pasting — with Ctrl+Shift+V, insert an equation copied from Word and elsewhere without worrying about its format.
- Equation gallery · sidebar — choose from the cards below the canvas (6.12), or bring things in from clips and favorites (5.2).
Empty slots are shown as ⬚. Moving between them with Tab and filling them in is the comfortable way.
5.4.2 The empty-canvas hint
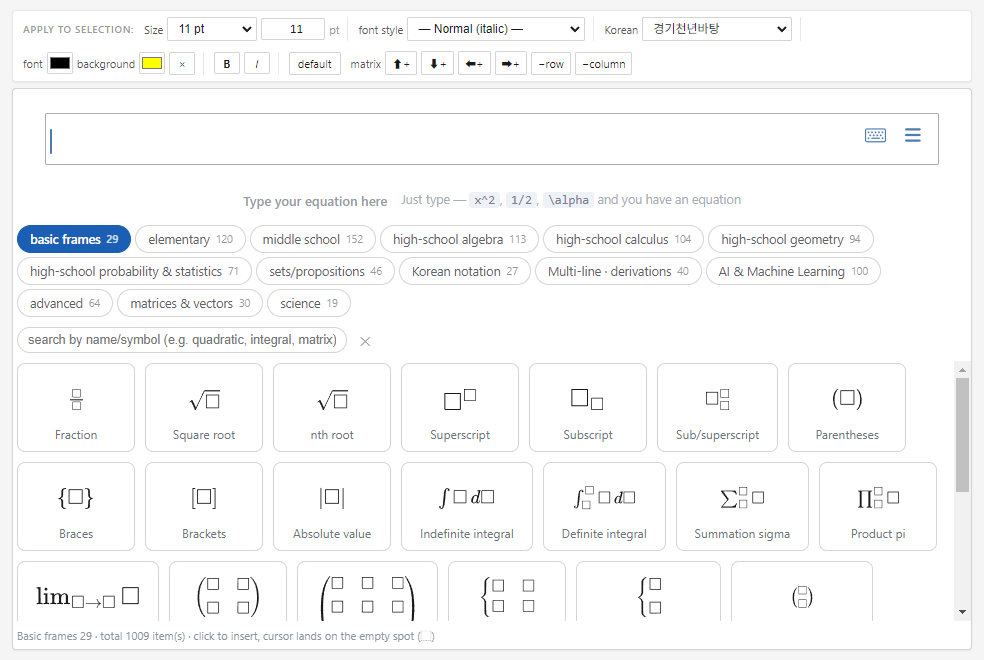
When the canvas is empty, the following hint is shown.
- Type your equation here
- Just type —
x^2,1/2,\alphabecome math - Ctrl+/ symbol search · Ctrl+F fraction · Ctrl+R radical · Enter add a row (multi-line)
- Choose from the ribbon, or paste a Word or Hangul equation with Ctrl+Shift+V
- Right-click = quick menu · when done, [Id InDesign] or Ctrl+S
5.4.3 The right-click menu
Right-click on the canvas and eleven things you might want to do right now appear.
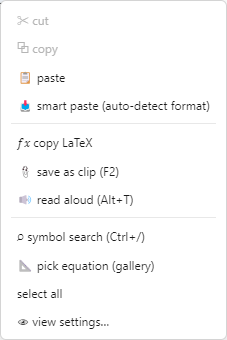
| Item | What it does | When it is dimmed |
|---|---|---|
| ✂ cut | Cuts the selection to the clipboard | When there is no selection |
| ⧉ copy | Copies the selection to the clipboard | When there is no selection |
| 📋 paste | Inserts the clipboard contents at the cursor | — |
| 📥 smart paste (auto format) | Works out the clipboard format by itself and inserts | — |
| 𝑓𝑥 copy LaTeX | Copies the LaTeX source of the current equation to the clipboard | — |
| 📎 save as clip (F2) | Saves the selection (or everything, if none) as a named clip | — |
| 🔊 read aloud (Alt+T) | Reads the equation aloud. Only the selection, if there is one. | — |
| ⌕ symbol search (Ctrl+/) | Opens the symbol search window. | — |
| 📐 pick equation (gallery) | Reopens the equation gallery if you closed it. | — |
| select all | Selects the whole equation. | — |
| 👁 view settings… | Opens the window for showing baselines, boundaries and the hierarchy. | — |
Close the menu by clicking outside it or pressing Esc. Even when opened at the edge of the window, the menu positions itself so that it is not cut off.
5.4.4 Autosave and recovery
Every time you type, the current equation is saved temporarily about 0.8 seconds later. When you close the window normally, a mark saying "ended cleanly" is left and the temporary copy is not used.
But if the program quits unexpectedly and is started again, a recovery bar appears at the top of the canvas.
- It shows the message "⚠ Your last editing session ended unexpectedly — recover the equation from around hh:mm?" together with the beginning of that equation.
- [restore] — brings that equation back into the canvas.
- [discard] — deletes the temporary copy.
5.4.5 Guides drawn over the canvas
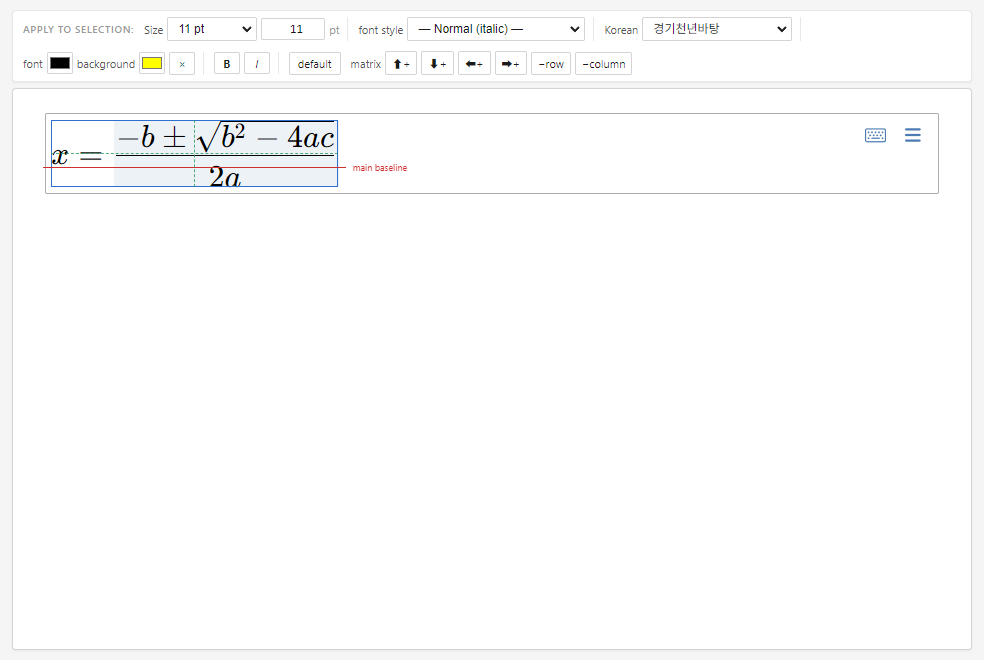
Switch them on under "view settings" (menu View → view settings, or the right-click menu) and guides such as baselines and boundaries are drawn over the canvas. There are nine.
| Item | What it shows | Shortcut |
|---|---|---|
| show boundaries | The rectangle the whole equation occupies | — |
| show main baseline | The baseline that is matched to the line of body text | Ctrl+Alt+Y |
| show baseline | Sub-baselines of numerators, denominators and so on | — |
| show center line | The horizontal and vertical middle | — |
| show placeholder hierarchy | The outlines of nested boxes | Ctrl+Shift+Y |
| show empty placeholder boxes | Slots whose content has not been filled in | — |
| show control characters | Spaces and alignment points | Ctrl+Y |
| show precision-nudge amount | Solid line = moved position, dashed line = original position | — |
| view in grayscale | A preview of the result in black-and-white printing | — |
[hide all] at the bottom of the view settings window switches them all off at once, and [redraw] (Ctrl+D) forces a fresh drawing when the screen looks stale.
5.5 The properties panel (right)
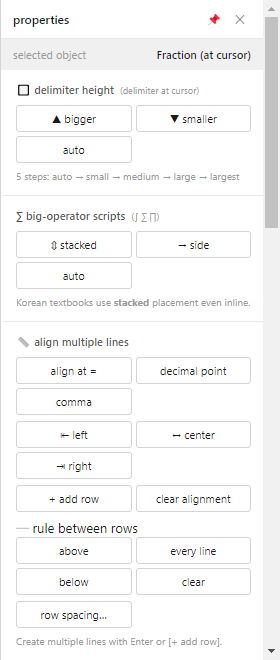
5.5.1 How it works — "only the one object the cursor is in"
You can check in three places which object the cursor is in now.
- The "selected object" display at the top of the panel — for example
fraction (at cursor) - The matching section is highlighted in blue.
- "current position" in the status bar — for example
denominator ‹ inside the radical
5.5.2 The head and foot of the panel
| Button | What it does |
|---|---|
| 📌 lock | Marks the panel as pinned. Click again to release it. |
| ✕ close | Hides the properties panel. It reappears when you restart the program. To bring it back right away, switch it on under menu Window → panel layout. |
| restore default (at the bottom) | Returns the formatting of the selection (color, background, weight, slant, size) to its initial state. The same action as [default] in the precision control bar. |
5.5.3 🔲 Delimiter height
Adjusts the height of the delimiters the cursor is in, in five steps — auto → small → medium → large → largest.
| Button | What it does |
|---|---|
| ▲ bigger | One step larger. Keep clicking and it keeps growing. |
| ▼ smaller | One step smaller. |
| auto | Returns to the state in which the delimiters stretch by themselves to the height of their content. |
5.5.4 ∑ Big-operator scripts
Sets the position of the limits of big operators such as ∫ ∑ ∏.
| Button | What it does |
|---|---|
| ⇕ stacked | Puts the limits above and below the sign. |
| → side | Puts the limits to the right of the sign. |
| auto | Lets it be decided automatically: at the side when inline, above and below when displayed. |
As the panel itself notes, Korean textbooks use the stacked form even inside a line of text. Stacking makes the equation taller, though, and affects the line spacing, so check the result when mixing it into body text.
5.5.5 📏 Align multiple lines
Handles the alignment of equations that run over several lines. Make the lines with Enter or with [+ add row] below.
| Button | What it does |
|---|---|
| align at = | Aligns the position of the first equals or inequality sign of each line vertically. Used for showing the steps of a calculation. |
| decimal point | Aligns the decimal points of each line. Only a period between digits counts. |
| comma | Aligns the commas of each line. |
| ⇤ left | Aligns the lines to the left. |
| ↔ center | Centers the lines. |
| ⇥ right | Aligns the lines to the right. |
| + add row | Adds one more line below. |
| clear alignment | Removes the alignment and keeps the lines. |
─ rule between rows — used to divide the steps of a calculation into blocks.
| Button | What it does |
|---|---|
| above | Adds a horizontal rule at the very top. |
| every line | Adds a horizontal rule between every pair of lines. |
| below | Adds a horizontal rule at the very bottom. |
| clear | Removes all the horizontal rules you added. |
| row spacing… | Opens a window for setting the spacing between lines. |
5.5.6 📐 Size info
Shows the dimensions the equation will really have in InDesign. It updates automatically as you type.
| Item | Meaning |
|---|---|
| width | The horizontal length of the equation. |
| height | The vertical length of the equation. |
| baseline | How far it goes below the baseline (the depth). The value that decides the vertical position when it is placed inside a line. |
| base size | The base font size being used in the calculation right now. |
The small drop-down at the right of the title switches the unit between pt · mm · inch. Useful for measuring in advance the width of an equation that will go inside a table.
5.5.7 ✥ Precision nudge
Moves the selected part by very small amounts. Use it when a script looks slightly too close, or when you want to raise a single symbol by a hair.
| Control | What it does |
|---|---|
| 8 direction arrows (↖ ↑ ↗ ← → ↙ ↓ ↘) | Moves in that direction by the "per step" value. |
| ⊙ in the middle | Returns it completely to its original position. |
| per step (number box) | The amount moved by one click of an arrow. 0.5 pt by default, 0.1–20 pt. |
| horizontal / vertical + [apply] | Set the amount of movement directly as numbers. For vertical, positive is up and negative is down. |
Shortcut: Ctrl+Alt+arrow keys make the same moves.
5.5.8 √ Radical alignment
| Button | What it does |
|---|---|
| baseline | Aligns the radical with the text baseline. |
| center | Aligns the radical with the center. |
Put the cursor inside the radical, then click.
5.5.9 📐 Fraction style
Changes the size style of the one fraction the cursor is in.
| Button | What it does |
|---|---|
| 𝑎/𝑏 display | A large fraction. Suits displayed equations. |
| a/b inline | An ordinary fraction. Its size depends on the context. |
| a/b small | A small fraction. For mixing into a line of text. |
5.5.10 ⎡⎤ Edit matrix · partition rules · row/column alignment
These work while the cursor is inside a matrix cell.
edit matrix
| Button | What it does |
|---|---|
| ⬆ row up | Inserts a row above the row the cursor is in. |
| ⬇ row down | Inserts a row below the row the cursor is in. |
| ⬅ col left | Inserts a column to the left of the column the cursor is in. |
| ➡ col right | Inserts a column to the right of the column the cursor is in. |
| − delete row | Deletes the row the cursor is in. |
| − delete column | Deletes the column the cursor is in. |
┼ partition rules — the dividers used for an augmented matrix [1 2 | 3] or a table-like layout.
The rule is placed relative to the cell the cursor is in.
| Button | What it does |
|---|---|
| │ left | Adds or removes a vertical rule on the left of that cell. |
| │ right | Adds or removes a vertical rule on the right of that cell. |
| ─ above | Adds or removes a horizontal rule above that row. |
| ─ below | Adds or removes a horizontal rule below that row. |
⇹ row/column alignment
| Button | What it does |
|---|---|
| ⇤ left / ↔ center / ⇥ right | Sets the horizontal alignment of the cell contents. |
| ⤒ top / ⇔ baseline / ⤓ bottom | Sets the vertical alignment of the matrix as a whole. |
Partition rules already inserted stay in place when you change the alignment.
5.5.11 ∫ Integral style
| Button | What it does |
|---|---|
| ∫ large (display) | Makes the integral sign the large size for displayed equations. |
| ∫ inline | Makes it the small size that mixes into a line of text. |
5.5.12 √ Radical index
| Control | What it does |
|---|---|
| n = (number box) | Sets which root it is. 2–20. |
| [apply] | Applies that index to the radical the cursor is in. Enter 2 and the index disappears, returning to an ordinary square root. |
5.6 The status bar

5.6.1 Left — four quick actions
| Button | What it does | Shortcut |
|---|---|---|
| 𝑓𝑥 view LaTeX | Opens or closes the LaTeX source box. | — |
| SVG copy SVG | Makes an SVG (vector graphic) of the equation and puts it on the clipboard. It is drawn by the same path as the real output, so the result does not differ from a screen version. | — |
| Id Place into InDesign | Places the equation in the InDesign document. The main button of this editor, highlighted in blue. | Ctrl+S |
| 📕 export PDF | Saves a PDF file. | — |
5.6.2 The LaTeX source box
Click [view LaTeX] and the source box opens above the status bar.
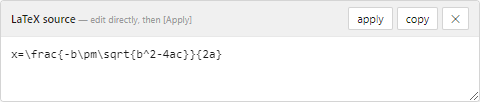
| Button | What it does |
|---|---|
| apply | Applies the LaTeX you edited in the box to the canvas. |
| copy | Copies the LaTeX source to the clipboard. |
| ✕ | Closes the box. |
5.6.3 Right — the current status
| Display | Meaning |
|---|---|
| current position | Shows in real time where in the equation the cursor is.
It reads like numerator denominator superscript inside the radical radical index
matrix row 2, column 3 upper limit,
and nested positions are strung together from the inside out, as in denominator ‹ inside the radical. |
| equation size | Shows the base size and script ratio now in effect (for example 10.5pt · script 50%).
If a separate size is set at the cursor, it is shown distinctly, as in 12pt (set). |
| output | Shows the export format. |
5.6.4 Zoom
| Button | What it does |
|---|---|
| − | Zooms out by 25%. The minimum is 100%. |
| The number in the middle | Shows the current zoom. |
| + | Zooms in by 25%. The maximum is 3200%. |
Finer control (steps of ±1%, and shortcuts to 100 · 200 · 400 · 800 · 1600 · 3200%) is in the "zoom" part of the view settings window.
5.7 The menu bar
The menu bar is always visible at the top of the window. Functions that are not in the ribbon are all here.
5.7.1 File
| Item | Shortcut | What it does |
|---|---|---|
| new equation | Ctrl+N | Clears the canvas and starts afresh. |
| Open… | Ctrl+O | Opens a saved .mymath equation file. |
| close equation | Ctrl+W | Closes the equation being edited. |
| save | Ctrl+Alt+S | Saves a .mymath file.
The current typesetting settings are stored along with the LaTeX, so it is reproduced exactly when opened later. |
| Save As… | Ctrl+Shift+S | Saves under a new name. |
| Place into InDesign | Ctrl+S | Places the current equation in the InDesign document. |
| Import equation files… | — | Reads equation files in other formats (the same as [📂 import file] in the ribbon). |
| convert equation files (multiple at once)… | — | Choose several files and convert them all at once to .mymath. For moving older material over. |
| copy as… | Ctrl+Shift+E | Choose one of several formats and copy it to the clipboard. |
| save as image… | — | Saves as PNG · JPEG · GIF · BMP · WMF. |
| print preview / print… | Ctrl+P | Shows the equation on A4, A5, B5 or Letter paper; print from there or make a PDF. |
| quit | Ctrl+Q | Closes the editor. |
5.7.2 Edit
| Item | Shortcut | What it does |
|---|---|---|
| undo | Ctrl+Z | Undoes the last edit. |
| redo | Ctrl+Shift+Z | Reapplies what was undone. |
| cut | Ctrl+X | Cuts the selection to the clipboard. |
| copy | Ctrl+C | Copies the selection to the clipboard. |
| paste | Ctrl+V | Inserts the clipboard contents. |
| select all | Ctrl+A | Selects the whole equation. |
| copy LaTeX | Ctrl+Shift+C | Copies the LaTeX source to the clipboard. |
| smart paste (auto-detect format) | Ctrl+Shift+V | Works out the clipboard format by itself and inserts. |
| convert typed TeX to an equation | Shift+Enter | Turns LaTeX typed as text in the canvas into real math. |
5.7.3 Format
| Item | Shortcut | What it does |
|---|---|---|
| Fraction \frac | Ctrl+F | Inserts a fraction frame at the cursor. |
| Square root \sqrt | Ctrl+R | Inserts a square-root frame. |
| Integral \int | Ctrl+I | Inserts an integral frame with upper and lower limits. |
| Sum \sum | Ctrl+Shift+S | Inserts a sum frame. |
| Superscript ^ | Ctrl+H | Makes a superscript slot. |
| Subscript _ | Ctrl+L | Makes a subscript slot. |
| insert matrix… | Ctrl+M | Opens the matrix wizard. |
| edit matrix ▸ | — | A submenu of six items: add row (above, below) · add column (left, right) · delete current row · delete current column. |
| font size ▸ | — | A submenu with 6 · 8 · 10 · 11 (body) · 12 · 14 · 18 · 24 pt and [reset]. |
| font color ▸ | — | A submenu with red · blue · green · orange · purple · black and [reset]. |
| bold | Ctrl+B | Makes the selection bold. |
| italic | Ctrl+Shift+I | Makes the selection italic. |
5.7.4 View
| Item | Shortcut | What it does |
|---|---|---|
| view settings… (baselines · boundaries · hierarchy) | — | Opens the window for the nine overlay guides, zoom, palette size and the baseline in exports. |
| redraw | Ctrl+D | Forces a fresh drawing when the screen looks stale. |
| enlarge window / shrink window / actual size | — | Changes the display scale of the whole program window (not the same as canvas zoom). |
| developer tools | — | A diagnostic window for looking into problems. Not used in normal work. |
5.7.5 Size
| Item | Shortcut | What it does |
|---|---|---|
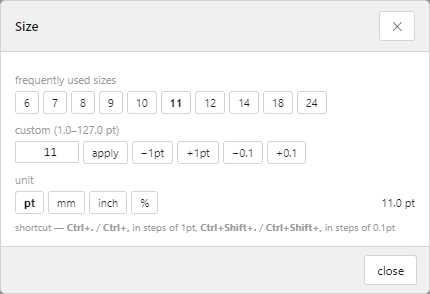
| size… | Ctrl+Alt+5 | Opens the window with the list of common sizes, direct entry (1.0–127.0 pt) and unit switching (pt/mm/inch/%). You can also adjust by 1 pt with Ctrl+. Ctrl+, and by 0.1 pt with Ctrl+Shift+. Ctrl+Shift+,. |
| lock height (match heights of equations in a table) | — | Holds the height of the equation constant. Used to match the heights of equations inside a table. |
| Stretchy integral… | — | Opens the settings for stretching the integral sign to match the height of the content beside it. |
5.7.6 Window
| Item | Shortcut | What it does |
|---|---|---|
| panel layout… (show/hide sections · detach) | — | Opens the window for switching screen areas on and off or detaching them (see 5.8). |
| color style… | — | Opens the window where named colors are created and managed. |
| import/export settings… | — | Sets the file-name rule used when exporting many at once, whether the original equation is included, the default image resolution and so on. |
| preferences… | Ctrl+; | Covers style sets · equation size · font style by category · print color · line thickness · precision spacing · Korean font for text in equations · inline vertical position · appearance · Korean publishing options · tab order. |
5.7.7 Help
| Item | Shortcut | What it does |
|---|---|---|
| help · tip of the day | — | Shows an introduction to the program, tips, and a summary of what it can do. |
| shortcut cheat sheet | — | Shows the shortcuts group by group on one screen. |
| read aloud | Alt+T | Reads the equation aloud. With a selection, only that part is read. Press again while it is reading to stop. |
| About MyMath | — | Shows the version and the components. |
5.8 Changing the layout
For when the screen is small, or when you want areas you do not use out of the way. Start from menu Window → panel layout.
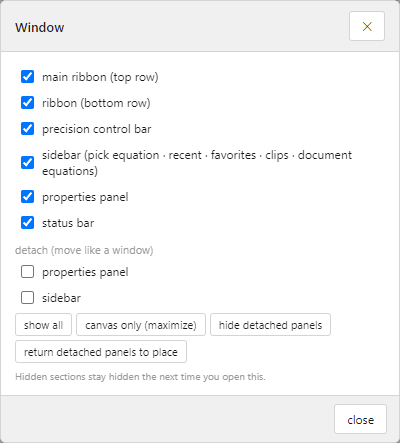
5.8.1 Showing · hiding areas
Untick an area and it disappears from the screen. Each of the six areas can be switched on and off.
| Area | What disappears when it is off |
|---|---|
| main ribbon (top row) | The clipboard · Edit · Korean textbook · equation structure · operator · calculus · structure · function groups |
| ribbon (bottom row) | The symbol · Format · font · import · export groups |
| precision control bar | The row of size · font style · color · B/I · matrix buttons |
| sidebar (pick equation · recent · favorites · clips · document equations) | The whole left sidebar |
| properties panel | The whole right panel |
| status bar | The quick actions, status display and zoom at the bottom |
At the bottom of the window there are also buttons that do it all at once.
| Button | What it does |
|---|---|
| show all | Switches every hidden area back on. |
| canvas only (maximize) | Switches off the sidebar · the properties panel · the ribbon's bottom row in one go to make the editing area as large as possible. |
| hide detached panels | Hides the detached windows from the screen. |
| return detached panels to place | Returns the detached windows to their original places. |
5.8.2 Detaching palettes
The properties panel and the sidebar can be detached like windows and moved freely. Handy on a wide monitor, with the canvas large in the middle and the panels pulled off to the side.
- Under "detach" in the panel layout window, tick [detach properties panel] or [detach sidebar].
- A title bar appears on top of the area. Drag this bar to move it where you like.
- To put it back, click the [⇤] button at the right of the title bar, or untick it in the panel layout window.
The position and size of a detached panel are remembered, so it is in the same place the next time you open the editor.
5.8.3 Changing the palette size
Enlarges or reduces the text and buttons of the ribbon, sidebar and properties panel all together. Use it when the buttons look too small on a high-resolution monitor.
- Open menu View → view settings.
- On the "palette size" row, click one of 80% · 90% · 100% · 115% · 130% · 150%.
- The value now in effect is shown in bold.
6. Writing equations — a hands-on tour
This is not a chapter to read but a chapter to follow along with. Keep the editor open and work through it from the top; by the time you reach the last section you will be able to build nearly every equation that turns up on a textbook page.
6.1 Just type
An equation editor does not mean picking everything from a palette. Common structures such as fractions and scripts take shape on the spot when you type them like ordinary text. The table below was checked by actually sending the keys to the canvas.
What takes shape as you type
| You type | You get | Explanation |
|---|---|---|
1/2 | The fraction one half | The moment you type /, what came before moves up as the numerator and the denominator slot opens |
(x+1)/2 | A fraction with numerator (x+1) | The whole parenthesized group just before it is taken as the numerator |
a/b/c | A fraction inside the denominator | Typing them in a row gives nested fractions |
x^2 | x squared | What you type after ^ goes into the superscript slot |
x_1 | x sub 1 | _ is the subscript slot |
R^n | R to the n | Letter scripts work the same way |
\pi + Space | π | Start with a backslash and you can type a LaTeX command directly |
\le + Space | ≤ | For symbols whose name you know, this is the fastest way |
\sqrt + Enter | An empty radical | When the slot opens, just type the content |
\frac + Enter | An empty fraction frame | Numerator and denominator both open as empty slots (⬚) |
alpha, sin, <=, >=, != and ->
stay exactly as typed. They do not turn into α, sin, ≤, ≥, ≠ or → by themselves.
Letter-by-letter auto-conversion is switched off so that variables whose names overlap (an expression with the variables a, l, p side by side, for example) are not turned into symbols against your will.
Do this instead —
\alpha+Space / Ctrl+G then A /
search with Ctrl+/.
Getting out of a fraction
When you make a fraction with /, the cursor stays in the denominator slot. Keep typing and everything goes into the denominator.
Type 1/2+1/3 straight through and the whole 2+⅓ ends up as the denominator.
- Type
1/2. The cursor is after the2in the denominator. - Press → (right arrow) once to come out of the fraction.
- Now type
+and carry on with the next term.
Shortcuts that call up a structure
| Keys | Inserts |
|---|---|
| Ctrl+F | Fraction |
| Ctrl+R / Ctrl+Shift+R | Square root / radical with an index |
| Ctrl+H / Ctrl+L / Ctrl+J | Superscript / subscript / both |
| Ctrl+I / Ctrl+Shift+S | Integral / sum |
| Ctrl+9 / Ctrl+0 / Ctrl+Shift+9 | ( ) / [ ] / { } |
| Ctrl+' / Ctrl+Shift+' | Prime / double prime |
| Ctrl+M | Matrix wizard |
Greek letters and symbols have their own two-step shortcuts. Press Ctrl+G and an assignment table appears at the bottom of the screen; press a letter next and that symbol goes in. There is nothing to memorize — read the table and choose.
| First key | Then | Inserts |
|---|---|---|
| Ctrl+G | A letter (Shift = capital) | 26 Greek letters — A→α, Q→θ, W→ω, Shift+G→Γ |
| Ctrl+K | A key | 28 symbols — S→∽ (similar), K→// (parallel), N→∞, 3→∴ |
| Ctrl+T | A key | 13 Korean textbook notations — P→ₙPᵣ, D→repeating decimal, V→vector, S→∑ stacked |
6.2 Fractions
Making one — four ways
- Type it — just type
3/4. The fastest way. - Shortcut — Ctrl+F. Numerator and denominator open as empty slots.
- Ribbon — the Fraction button in "equation structure" on the top row. 17 fraction forms on one screen.
- Search — Ctrl+/, then
fractionorfrac.
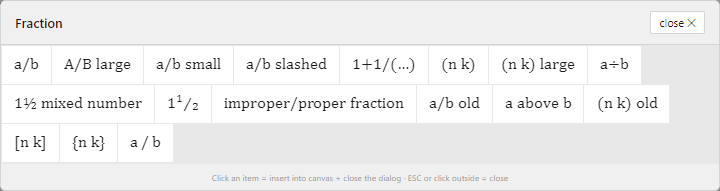
Moving between slots
Tab takes you from the numerator to the denominator, Shift+Tab brings you back, and → takes you out of the fraction.
Nested fractions
- Type
1/2. - With the cursor still in the denominator slot, press Ctrl+F — another fraction appears inside the denominator.
- For many levels, as in a continued fraction, use the
\cfracitem (1+1/(…)) of the "Fraction" family: the size does not shrink level by level, so it stays readable.
Display · inline · small fractions
The same a/b needs a different size inside a line of text and set large on a line of its own.
Put the cursor inside the fraction you want to change and choose under
📐 fraction style in the properties panel on the right.
| Button | LaTeX | Where it is used |
|---|---|---|
| display | \dfrac | Displayed equations. Numerator and denominator stay at text size |
| inline | \frac | The default. It adapts to where it sits |
| small | \tfrac | Inside a line. Pushes the line height up less |
Fraction bar thickness
In print, a heavy fraction bar looks untidy.
Under Ctrl+; (Preferences) → line thickness (print quality), enter a pt value for fraction bar.
0 means automatic. At 11 pt body text the automatic value is about 0.66 pt, which is on the heavy side for print.
- Ctrl+; → find "line thickness (print quality)".
- Enter a value such as
0.35for fraction bar. - The preview just below is redrawn through the real output path — check it by eye and save.
Internally the value is converted to em, so the proportion is kept whether the body text is 9 pt or 14 pt. Save combinations you use often as a style set (Ctrl+E) and you can load them in one step for the next job.

6.3 Radicals
The "Radical" family has four items.
| Item | LaTeX | Description |
|---|---|---|
| √x | \sqrt{ } | Square root |
| ⁿ√x | \sqrt[n]{ } | General radical; you enter the index |
| ³√x | \sqrt[3]{ } | Cube root — the index 3 is already in |
| ⁴√x | \sqrt[4]{ } | Fourth root |
Making a square root
- Press Ctrl+R. An empty radical appears with the cursor inside.
- Type
b^2-4ac. - Come out of the radical with →.
Adding an index
To turn a √x you have already made into a cube root,
put the cursor inside that radical and, under √ radical index in the properties panel,
enter 3 for n = and click apply.
Set it back to n = 2 and the index disappears, returning to an ordinary square root.
Alignment of a radical
There are two choices for where the radical sits on the line: baseline / center under √ radical alignment in the properties panel. Baseline aligns with the text baseline; center aligns with the middle of the radical as a whole. In a book where radicals often appear inside lines of text, baseline keeps the lines steadier.
Radical line thickness
It is in the same place as for fractions — Preferences → line thickness (print quality) → radical rule. The top line and the tail of the radical change together.

6.4 Scripts
The four basics
| Type / keys | Result | Explanation |
|---|---|---|
^ · Ctrl+H | Superscript | x^2 |
_ · Ctrl+L | Subscript | x_1 |
| Ctrl+J | Both at once | x_i^n — both slots open together |
| "Script" family ₐxᵇ | Prescript | A script attached before the letter |
Prescripts — essential for permutations and combinations
A script that comes before the letter, as in ₅P₃, cannot be made by plain typing. The shortest route is Ctrl+T then P.
- Press Ctrl+T — the assignment table appears.
- Press P — the frame
{}_{⬚}\mathrm{P}_{⬚}goes in. 5in the front slot, Tab,3in the back slot.
\mathrm so that it is drawn upright.
Type a plain P and it becomes an italic P, unlike the textbook page.
The items ₙPᵣ · ₙCᵣ · ₙHᵣ · ₙΠᵣ in the "Korean notation" family are all treated the same way.
Nested scripts
To put a script inside a script, as in x^{2^n}, type ^ again inside the script slot.
Think of it as pressing → once for every slot you leave and you will not get lost.
The "Script" family also has these special forms.
| Item | LaTeX | Where it is used |
|---|---|---|
| x⁽ⁿ⁾ | ^{(n)} | The nth derivative |
| f|ᵇₐ | \Big|_{a}^{b} | The evaluation bar in a definite integral |
| substack | \substack{ \\ } | Two lines of conditions under a sum sign |
| overset / underset | \overset{ }{=} | Putting text above or below an equals sign |
| x' · x'' | ' · '' | Prime (Ctrl+') |
Script size
What percentage of the body size scripts shrink to differs from publisher to publisher and book to book. You can set the values yourself.
- Ctrl+; → open the equation size group.
- Enter the base size (0 follows the InDesign body text size), script % and scriptscript %.
- Check the preview and save. The status bar shows the current values, as in
10.5pt · script 50%.
If you worry about scripts clogging up in print, try switching on make scripts a bit bolder under 🇰🇷 Korean publishing options in Preferences. Only the scripts get slightly heavier, so they stay legible at small sizes.

6.5 Big operators — integral · sum · product · limit
Each of the four has its own family. The common forms are ready with their limits already in place, so all you do is choose.
| Family | Items | Typical items |
|---|---|---|
| Integral ∫ | 24 | Indefinite · definite a to b · 0 to ∞ · ∬ · ∭ · ⨌ · ∮ · ∯ · ∰ · dx·dV·dA·ds |
| Sum ∑ | 8 | i=1 to n · 0 to ∞ · double sum · multiple conditions with \substack |
| Product ∏ | 11 | ∏ · ∐ · ⋃ · ⋂ · ⨁ · ⨂ · ⨀ |
| Limit lim | 11 | x→a · x→0 · x→∞ · one-sided limits · limsup · liminf · sup · inf |
Making a definite integral
- Ribbon top row, "operator" → click Integral.
- Choose ∫ₐᵇ f dx — the lower and upper limits and the
dxgo in with it. - Click the limit slots and change them to
0and1, then write the integrand in the middle.
Putting limits above and below the sign
Korean textbooks put the limits of ∑ and lim above and below the sign even inside a line of text. The default typesetting rule puts them at the side when inline, so left alone the page gives a different impression.
Put the cursor inside the operator and choose under ∑ big-operator scripts in the properties panel.
| Button | LaTeX | Result |
|---|---|---|
| ⇕ stacked | \limits | Limits above and below the sign |
| → side | \nolimits | Limits to the right of the sign |
| auto | — | At the side when inline, above and below when displayed |
To insert them stacked from the start, use ∑ stacked · under lim in the "Korean notation" family, or press Ctrl+T then S / M.
Size of the integral sign
Choose large (display) / inline under ∫ integral style in the properties panel.
Stretchy integral — growing to match the content beside it
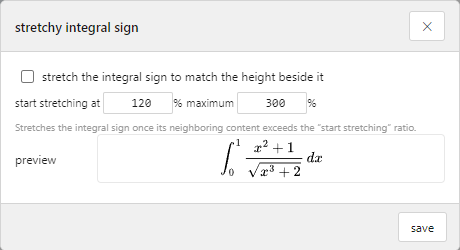
In front of a tall expression containing fractions or radicals, the integral sign looks small by comparison. Menu "Size" → Stretchy integral… can match it automatically.
- Open menu Size → Stretchy integral….
- Switch on stretch the integral sign to match the height beside it.
- start stretching at (default 120%) — the sign stretches when the equation is taller than the integral sign by more than this ratio.
- maximum (default 300%) — however tall the content, this scale is never exceeded.
- Check the preview and save.
The sign is held at the bottom and stretched upward, so the baseline does not shift. The stretch is part of the output shapes themselves, so it carries over exactly to the vector PDF placed in InDesign.


6.6 Delimiters
Delimiters that fit the content height automatically
The 8 basic items of the "Delimiters" family are all of the \left … \right kind.
Whether a fraction or a matrix goes inside, the delimiters match the height by themselves.
| Item | LaTeX | Name |
|---|---|---|
| (·) | \left( \right) | Parentheses |
| [·] | \left[ \right] | Square brackets |
| {·} | \left\{ \right\} | Braces |
| |·| | \left| \right| | Absolute value |
| ‖·‖ | \left\| \right\| | Norm |
| ⟨·⟩ | \langle \rangle | Angle brackets |
| ⌊·⌋ | \lfloor \rfloor | Floor |
| ⌈·⌉ | \lceil \rceil | Ceiling |
Setting the size by hand — 5 steps
Sometimes the automatic size looks too large or too small for the page. Put the cursor inside the delimiters and move through the steps with ▲ bigger / ▼ smaller under 🔲 delimiter height in the properties panel.
auto (\left\right) ↔ \big ↔ \Big ↔ \bigg ↔ \Bigg
Click auto at any time to return to \left … \right.
\big( are not one matched unit but two separate symbols.
That is why the range stays selected right after a change —
click ▲ again and it grows further. If you have clicked elsewhere, select the delimiters again and then click.
Unmatched delimiters
Delimiters with only one side, or with different left and right sides, can be made too — the interval notation (a, b]
or the evaluation bar f(x)\big|_a^b, for instance. They are under more in the "Delimiters" family.
| Item | LaTeX | Where it is used |
|---|---|---|
| (·] | \left( \right] | Half-open interval |
| [·) | \left[ \right) | Half-open interval |
| ·| | \left. \right| | One-sided delimiter with the left side empty — the evaluation bar |
| ⦇·⦈ | \left(\left( \right)\right) | Double parentheses |
\left. means "there is a delimiter here, but do not draw it".
It only holds the place so that the pair is matched, and it is what lets the vertical bar on the right grow to the height of the content.
6.7 Matrices
The matrix wizard
Unlike the other families, the ribbon's Matrix button opens not a list of items but a wizard. Ctrl+M does the same.
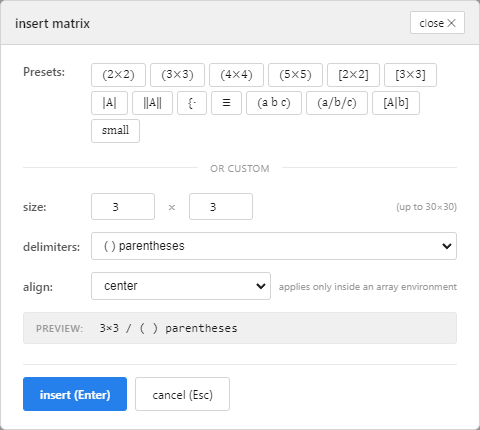
The wizard has two parts.
- Presets — 14 common forms lined up as buttons. Click one and it goes straight in and the wizard closes.
- or custom — enter the number of rows and columns yourself, from 1 to 30, that is, up to 30×30.
The 14 presets
| Button | Contents |
|---|---|
| (2×2) (3×3) (4×4) (5×5) | Four square matrices in parentheses |
| [2×2] [3×3] | Matrices in square brackets |
| |A| | Determinant (vertical bars) |
| ‖A‖ | Double vertical bars |
| {· | Cases — a function defined piecewise |
| ≡ | Aligned equations — several lines aligned at the equals sign |
| (a b c) / (a/b/c) | Row vector 1×3 / column vector 3×1 |
| [A|b] | Augmented matrix — the form with a vertical divider |
| small | A small matrix for use inside a line of text |
Custom
- Ribbon "structure" → Matrix (or Ctrl+M).
- Enter the number of rows and columns under Size (for example
4×5). - Choose the delimiters — ( ) · [ ] · { } · | | · ‖ ‖ · none · array, 7 kinds.
- align is center / left / right. It applies only when you chose array.
- The preview below shows the current settings, as in
4×5 / [ ] square brackets. - Insert (Enter) — every cell opens as an empty slot (⬚). Esc cancels.
Filling the cells
Move from cell to cell with Tab. At the end of a row, Tab goes to the first cell of the next row. You can also click a cell directly with the mouse.
Adding and deleting rows and columns
With the cursor inside a matrix cell, use the "matrix" group of the control bar above the canvas or the six buttons under ⎡⎤ edit matrix in the properties panel.
| Button | What it does |
|---|---|
| ⬆ row up / ⬇ row down | Inserts a row above or below the row the cursor is in |
| ⬅ col left / ➡ col right | Inserts a column to the left or right of the column the cursor is in |
| − delete row / − delete column | Deletes the row or column the cursor is in |
Partition rules — making an augmented matrix
A form with a vertical divider, like the coefficient matrix of a system of equations, can be made in one step with the four buttons under ┼ partition rules in the properties panel.
- Make a matrix with 3 columns and fill in the values.
- Click where you want the divider — any cell in column 2 — to put the cursor there.
- Click │ right. A vertical line appears between columns 2 and 3.
Use │ left · ─ above · ─ below in the same way. They work just as well for building a table-like layout.
Row and column alignment
Under ⇹ row/column alignment in the properties panel, the horizontal choices are ⇤ left · ↔ center · ⇥ right, and the vertical ones ⤒ top · ⇔ baseline · ⤓ bottom. In a table of numbers, right alignment lines the digits up and reads well.
Adding alignment or partition rules automatically turns a frame such as pmatrix into array,
because it has to be a frame that accepts column formatting. The visible delimiters stay the same, and
partition rules already inserted are not lost when you change the alignment.

6.8 Multi-line equations
When a derivation runs over several lines, it reads well only if the equals signs line up vertically. You do not align them with spaces by hand; you choose what to align on.
Making the lines
- Write the first line —
x^2-5x+6=0. - Click + add row under 📏 align multiple lines in the properties panel.
- Write the next step on the new line —
(x-2)(x-3)=0. - Repeat + add row as often as you need.
Three things to align on
| Button | What is aligned |
|---|---|
| align at = | The position of the first relation sign in each line. Not only = but
< > ≤ ≥ ≠ ≈
≡ ∽ → ⇒ ∈ ⊂ and others —
26 kinds are recognized |
| decimal point | The position of the decimal point in each line. Only a period between digits counts —
sentence periods and ⋯ are left alone |
| comma | The position of the comma in each line |
To align whole lines without a reference point, use ⇤ left · ↔ center · ⇥ right. clear alignment removes the alignment and keeps the lines.
cases are not taken as alignment points.
Only the equals signs of the outer lines are aligned. Clicking the same button twice does not pile up alignment marks.
If there is nothing to align, the equation is left untouched and you are simply told so.
Rules between rows
Column arithmetic and table-like layouts need horizontal rules. They are the four buttons above · every line · below · clear in the properties panel.
aligned).
So when you add a rule, the frame is automatically changed to array and you are told so.
The visible alignment is kept.
Row spacing
When the lines feel cramped or too far apart, set a value with the row spacing… button. The unit is em (a proportion of the font size), so the proportion holds when the body size changes. Clear the value to return to the default spacing.

6.9 Hangul inside equations
(단, x>0), (자연수)÷(자연수), {x | x는 10 이하의 자연수} —
this is notation the Korean curriculum notice itself uses. It is the formal style, not an exception, so it has to be easy to write.
Inserting Hangul
- Choose the Korean item (
\text{ }) in the "Accents" family, or type\text+ Enter. - Type the Korean text straight into the slot that opens.
- Come out with →.
The common forms are in the "Korean notation" family, complete.
| Item | LaTeX | Where it is used |
|---|---|---|
| (단, …) | \quad \text{(단, )} | A proviso ("provided that…"). Ctrl+T T |
| Korean fraction | \dfrac{\text{ }}{\text{ }} | The (natural number)÷(natural number) form. Ctrl+T F |
| {x | …} | \{ \mid \text{} \} | Set-builder notation |
| 각 ㄱㄴㄷ | \text{각 } | Elementary school — vertices named with Korean consonants |
Choosing the Korean font
The page looks natural only when Hangul inside equations has the same shape as the body font.
- Ctrl+; → go to the Korean font for text in equations group.
- Type part of a name in the find font box —
Myungjo,Nanum,Batang. - Choose from the list below. It shows every Korean font installed on the computer.
- Check the shape in the preview.
\dfrac{\text{long Korean text}}{\text{long Korean text}} grows wide
and can exceed the width of the InDesign text frame.
Consider shortening the words, or using the ÷ notation instead of a fraction.

6.10 Typefaces and color
11 typefaces
This is the font style list in the control bar above the canvas. First select the part you want to change by dragging, then choose.
| Name | LaTeX | Where it is used |
|---|---|---|
| Normal (italic) | — | The default. Italic is standard for variables |
| 𝑥 italic | \mathit | When you want the slant set explicitly |
| 𝒙 bold | Bold italic | Emphasis |
| x roman (upright) | \mathrm | Units, function names, the P of a permutation |
| 𝐱 bold roman | \mathbf | Names of vectors and matrices |
| 𝗑 sans-serif | \mathsf | Names of figures and the like |
| 𝚡 monospace | \mathtt | Code |
| 𝕩 blackboard bold | \mathbb | ℝ ℕ ℤ ℚ ℂ |
| 𝓍 calligraphic | \mathcal | Families of sets, transforms |
| 𝔵 fraktur | \mathfrak | Algebraic structures |
| 𝒳 script | \mathscr | Script lettering |
Bold · italic
The B / I buttons of the control bar, or Ctrl+B / Ctrl+Shift+I. If the style is already on, click once more to remove it. When you move the cursor, the buttons and the font style list update by themselves to match that spot, so you can see what formatting the cursor is currently inside.
Font size
Set the size of the selected part with the Size list (6–72 pt) in the control bar or the input box beside it. You can also fine-tune it from the keyboard.
| Keys | What they do |
|---|---|
| Ctrl+. / Ctrl+, | Up / down by 1 pt |
| Ctrl+Shift+. / Ctrl+Shift+, | By 0.1 pt |
Under menu Size → Size… you can enter 1.0–127.0 pt directly and also view the value in pt · mm · inch · %. With no size specified, the equation simply follows the InDesign body text size.
Adding color
- Select the part to color by dragging.
- Click the color box beside font in the control bar and choose a color.
- The background color is the background box; to remove it, the × button next to it.
Six common colors are ready under menu Format → font color: red, blue, green, orange, purple and black.
Named colors — color styles
If colors carry a meaning in your book — "answers in blue, warnings in red" — use color styles: 🎨 color style under "font" in the ribbon's bottom row.
- Register a color under a name (for example
answer). - The equation stores only the name, not the color value.
- Change the color value of that name later and every equation that uses the style changes with it.
6.11 Symbol search Ctrl+/
No need to wonder "which family was the cube root in?" Press Ctrl+/ and type the name.
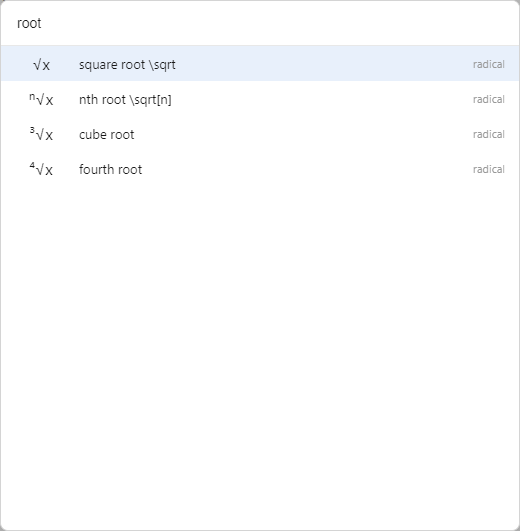
- Press Ctrl+/.
- Type what you are looking for — the name in the language of the screen, the Korean name or a LaTeX command all work.
- Choose with ↑ ↓. Each line shows the symbol · its name · which family it is in.
- Enter inserts it at the cursor. Esc closes.
It finds things under other names too
The name written in the palette and the name people actually use are not the same.
The family is called "Radical", but plenty of people look for root.
So each family carries a set of synonyms as well.
| Family | These also find it |
|---|---|
| Radical | sqrt · root · radical · 근호 · 제곱근 |
| Fraction | frac · fraction · 분자 · 분모 |
| Script | sup · sub · superscript · subscript · 지수 · 제곱 |
| Delimiters | bracket · paren · fence · 소괄호 · 대괄호 · 중괄호 |
| Integral | integral · int · 인테그랄 |
| Sum | sigma · sum · 시그마 |
| Product | product · prod · 파이 |
| Limit | lim · limit · 리미트 |
| Derivative | derivative · 도함수 · 프라임 |
| Partial derivative | partial · 라운드 |
| Matrix | matrix · 매트릭스 · 행 · 열 |
| Function | sin · cos · tan · log · 삼각함수 · 로그 |
| Accents | hat · vec · bar · dot · 벡터 · 화살표 · 밑줄 · 윗줄 |
| Greek | greek · alpha · beta · gamma · 알파 · 베타 · 감마 |
| Relation | 등호 · 부등호 · 닮음 · 합동 (and the translated item names) |
| Operator | 더하기 · 빼기 · 곱하기 · 나누기 (and the translated item names) |
| Arrow | arrow · 이면 · 필요충분 |
| Sets/logic | set · logic · 부분집합 · 합집합 · 교집합 · 원소 |
| Digit | 분수꼴 · 로마 · 원문자 · 번호 |
| Korean notation | 순열 · 조합 · 순환소수 · 교과서 |
6.12 Pick equation — the equation gallery
Instead of typing from scratch, you can pick a finished equation and edit it. When you open the editor, family tabs and equation cards drawn for real are laid out below the canvas — 14 families, 1009 equations. Click a card and it goes into the canvas with the cursor in the first empty slot (⬚). Just change the numbers and letters.
- Choose a family tab. Each tab shows its count.
- Or type a name or symbol in the search box at the top —
quadratic,integral,matrix. - Click a card. It is inserted at the cursor, so you can also join several pieces together.
- Move through the empty slots with Tab and fill them in.
| Family | Count | What is in it |
|---|---|---|
| Basic frames | 29 | Empty frames such as fraction, radical, scripts, integral, matrix |
| Elementary | 120 | Fraction and decimal arithmetic · column arithmetic (up to division with a remainder) · units · area and volume |
| Middle school | 152 | Integers and expressions · equations and inequalities · functions · similarity · circles · probability |
| High-school algebra | 113 | Factoring · equations and inequalities · exponents and logarithms · sequences |
| High-school calculus | 104 | Limits · derivatives · integrals · series |
| High-school geometry | 94 | Trigonometric functions · conic sections · vectors · solid figures |
| High-school probability & statistics | 71 | Permutations and combinations · probability · distributions · estimation |
| Sets/propositions | 46 | Set operations · propositions · methods of proof |
| Korean notation | 27 | Repeating decimals · ₙPᵣ · similar ∽ · parallel // · Hangul inside equations |
| Multi-line · derivations | 40 | Derivations aligned at the equals sign · piecewise conditions |
| AI & Machine Learning | 100 | Loss functions · optimization · attention · arg min · arg max |
| Advanced | 64 | University-level material such as Maclaurin series, eigenvalues, Jacobians, Fourier series |
| Matrices & vectors | 30 | Determinants · inverse matrices · dot and cross products · norms |
| Science | 19 | Physics and chemistry formulas |
7. Korean textbook notation
Mathematical notation follows different conventions from country to country. If you simply use the symbols that are common internationally, what goes out differs from the pages of Korean textbooks and workbooks. So that you don't have to memorize these differences, MyMath puts a "Korean notation" palette first among the palettes and in the first group of the ribbon.
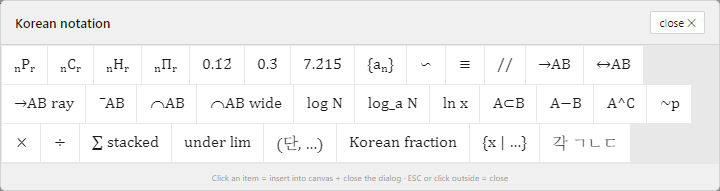
7.1 What it is based on
The reference is the list of <terms and symbols> in the Ministry of Education's notified mathematics curriculum (Annex 8).
The original notices of the 2009, 2015 and 2022 revisions were compared against each other.
In the 2022 revision, <terms and symbols> no longer exists as a separate item;
it is written into the "considerations when applying the achievement standards" of each area as sentences.
≤ ≥, not ≦ ≧. All three revisions write ≤, ≥.
Also, these signs are introduced in middle school; elementary school uses only > and <.
7.2 Symbols that differ from international notation
The symbols in the table below are different characters even where they look alike. In particular, similarity ∽ (U+223D) and ∼ (U+223C) are separate characters, mirrored left to right.
| Meaning | Commonly used | Korean textbooks | Note |
|---|---|---|---|
| Similar | \sim (∼) | \backsim (∽) | A different character, mirrored left to right |
| Congruent | \cong (≅) | \equiv (≡) | Where Korean and international notation part ways |
| Parallel | \parallel (∥) | \mathbin{/\!/} (//) | The notice itself prints two slashes |
| Vector | \vec{a} (short hook) | \overrightarrow{a} | A long arrow covering the whole letter |
| Subset | \subseteq (⊆) | \subset (⊂) | ⊆ is not in the notice's list |
| Set difference | \setminus | A-B | A plain minus sign |
| Complement | A^c (lowercase) | A^{C} (uppercase) | |
| Negation | \neg p | \sim p (~p) | |
| Common logarithm | \log_{10} | \log | Omitting the base is the formal style |
| Natural logarithm | \log_e | \ln |
The "symbol > relation" palette still has the international forms too, each with a description
that tells you which is which. For instance, the description of the \cong item reads
"congruent \cong — international notation. Korea uses ≡", and that of \parallel reads
"parallel \parallel — international notation. Korea uses //". When typesetting international papers or English-language books,
pick those.

7.3 All 32 items of the "Korean notation" palette
Clicking a palette button places the result below at the cursor.
▯ is an empty slot to fill in; the cursor lands in the first ▯.
| # | Item | Result | Description |
|---|---|---|---|
| 1 | ₙPᵣ | {}_{▯}\mathrm{P}_{▯} | Permutation. The P stands upright only with \mathrm |
| 2 | ₙCᵣ | {}_{▯}\mathrm{C}_{▯} | Combination |
| 3 | ₙHᵣ | {}_{▯}\mathrm{H}_{▯} | Combination with repetition |
| 4 | ₙΠᵣ | {}_{▯}\Pi_{▯} | Permutation with repetition |
| 5 | 0.1̇2̇ | 0.\dot{▯}\dot{▯} | Repeating decimal — two digits (a dot on each end) |
| 6 | 0.3̇ | 0.\dot{▯} | Repeating decimal — one digit |
| 7 | 7.2̇15̇ | ▯.\dot{▯}{▯}\dot{▯} | Repeating decimal — three digits. Dots on the first and last digits only; the middle is left bare |
| 8 | {aₙ} | \{a_{▯}\} | Sequence. Plain braces are LaTeX grouping syntax, so they would vanish |
| 9 | ∽ | \backsim | Similar. Not \sim |
| 10 | ≡ | \equiv | Congruent. Korea uses ≡, not ≅ |
| 11 | // | \mathbin{/\!/} | Parallel. Korea uses //, not ∥ |
| 12 | →AB | \overrightarrow{▯} | Vector — an arrow covering the whole letter |
| 13 | ↔AB | \overleftrightarrow{\mathrm{▯}} | Line |
| 14 | →AB (ray) | \overrightarrow{\mathrm{▯}} | Ray — \mathrm is applied so that the point names stand upright |
| 15 | ‾AB | \overline{\mathrm{▯}} | Line segment |
| 16 | ⌒AB | \overset{\frown}{\mathrm{▯}} | Arc — a small ⌒, close to the look of the textbooks |
| 17 | ⌒AB (wide) | \overparen{\mathrm{▯}} | Arc — a wide arch |
| 18 | log N | \log ▯ | Common logarithm — omitting the base is the formal style |
| 19 | log_a N | \log_{▯} | Logarithm with a base |
| 20 | ln x | \ln ▯ | Natural logarithm. Not \log_e |
| 21 | A⊂B | \subset | Subset. ⊂, not ⊆ |
| 22 | A−B | - | Set difference. A minus sign, not \setminus |
| 23 | A^C | ^{C} | Complement — capital C |
| 24 | ~p | \sim ▯ | Negation. Not \neg |
| 25 | × | \times | Multiplication — × even in high school, not \cdot |
| 26 | ÷ | \div | Division |
| 27 | ∑ stacked | \sum\limits_{▯}^{▯} | Sum — limits above and below even inline |
| 28 | under lim | \lim\limits_{▯ \to ▯} | Limit — the condition below even inline |
| 29 | (단, …) | \quad \text{(단, ▯)} | A proviso in Hangul ("provided that…"). The notice itself uses this as formal notation |
| 30 | Korean fraction | \dfrac{\text{▯}}{\text{▯}} | The (natural number)÷(natural number) form |
| 31 | {x | …} | \{ ▯ \mid \text{▯} \} | Set-builder notation — the condition is written in Hangul |
| 32 | 각 ㄱㄴㄷ | \text{각 ▯} | Elementary school — vertices are named with Hangul consonants and the ∠ sign is not used |
7.4 Things that are hard to build by hand
Repeating decimals — where the dots go is the rule
Dots go on the first and last digits of the repeating block only; the middle is left bare.
The example in the notice itself has the form 7.\dot{2}1\dot{5}.
Dotting the middle digits too would mean something else.

The four permutation and combination forms
Without \mathrm, the P, C and H slant into italics and no longer match the textbook page.
The palette items already include \mathrm.
The pre-subscript is held in place by an empty {} group — in the editing view this empty group
shows as an empty-slot mark (⬚), but it is tidied away in the output.
Sequences {aₙ}
In LaTeX, braces are grouping syntax, so typed plainly they do not appear on screen.
The palette item inserts the escaped form \{ \}.
Lines, rays, segments and arcs
| Meaning | Command | Shape |
|---|---|---|
| Line | \overleftrightarrow{\mathrm{AB}} | Arrow at both ends |
| Ray | \overrightarrow{\mathrm{AB}} | Arrow at one end |
| Segment | \overline{\mathrm{AB}} | Horizontal rule |
| Arc | \overset{\frown}{\mathrm{AB}} | A small ⌒ (close to the textbook look) |
| Arc (wide arch) | \overparen{\mathrm{AB}} | An arch spanning the width of the letters |
\overgroup is not in the output engine and produces an error. \wideparen and \overarc are accepted as the same thing as \overparen.
For arcs, use \overset{\frown} or \overparen.
7.5 The multiplication sign
× continues to be used in high school as well, as in 750°=360°\times 2+30°.
This differs from the preference for \cdot common in English-language typesetting.
- In algebraic expressions the multiplication sign is omitted —
3ab - The middle dot
·is reserved for the vector dot product \cdot(U+22C5) inside an equation and the middle dot of Korean body text (U+00B7) are different characters. Mixed on the same page, their widths look off
7.6 Stacking the limits of Σ and lim even inline
By default, the typesetting engine places the limits of Σ, ∏ and lim beside the symbol when inline.
Korean textbooks place them above and below even inline.
The ∑ stacked and under lim items of the "Korean notation" palette
insert the form with \limits attached.
| Use | What is inserted | Result |
|---|---|---|
| Sum | \sum\limits_{k=1}^{n} | Range above and below Σ |
| Limit | \lim\limits_{n \to \infty} | Condition below lim |
For an equation already built, the position of the limits can be changed under "big-operator scripts" in the properties panel:
⇕ stacked / → side / auto.
Only the one operator that contains the cursor changes.


7.7 Hangul inside equations
The notice itself uses notation such as (자연수)÷(자연수) and {x | x는 10 이하의 자연수}.
It is the formal style, not an exception. MyMath draws Hangul inside equations
by taking the outlines directly from an installed Korean font,
so print quality (K100 vector) is kept without installing any extra font on the InDesign side.
Choose the font under "Korean font for text in equations" in Preferences.
8. Vertical position
An equation placed inside a line of text (inline) can look slightly raised or lowered against the body text — this is the thing that most often needs a hand in equation typesetting. MyMath aligns it automatically at the moment you place it, and if something still catches the eye, lets you fine-tune that one equation by hand.
8.1 Automatic alignment — how it works
When you place an equation inline, the following happens automatically, in this order.
- Center vertically in the line — the vertical center of the equation is matched to the visual center of the body text. The target is a height of 0.44 × the body text size (above the baseline); half the equation's height is subtracted from it to get the anchor's vertical offset. Whether the body text is 9 pt or 12 pt, the result is proportional to the text size, so the equation sits at the same ratio.
- Recompose the text — the paragraph containing the equation is composed again. If this step were skipped, body text could appear to vanish from the screen.
- Measure and correct — after placing, the actual deviation is measured and corrected (up to 3 times). The baseline of the equation's anchor character and the baseline of the body character right next to it are read, and the equation is raised by the difference.
The body text size used for the reference vertical position is read from the character size at the spot where the equation is placed. If it cannot be read, 11 pt is assumed.
8.2 Fine-tuning a single equation
Use the Vertical offset row under "Connection settings" in the panel. Automatic alignment gets most equations right; this is for the occasional equation that is unusually large and catches the eye.
- Click the equation in InDesign to select it.
The vertical offset display in the panel changes to that equation's actual value, such as
+2.5 pt (selected). - Choose the step in the dropdown —
1/0.5/0.25/0.1/0.05pt. The default is 0.25 pt; your choice is saved and kept for next time. - ▲ up / ▼ down — each click moves it by one step immediately.
- Gone too far? 0 returns it to the standard automatic position (the measured correction runs again too).
| Situation | Display | What ▲▼ do |
|---|---|---|
| An equation is selected | That equation's actual vertical value (pt) | Move that one equation only |
| Nothing selected | "Select an equation" | Nothing happens; a hint is shown |
After a move, the status line shows both the requested value and the amount actually moved,
for example This equation: vertical 3.2 pt · moved +0.25 pt.
If the actual movement is 0.00, the value was not applied,
so check whether the equation is inline or placed freely on the page.
A free-standing equation has no anchor offset, so the panel reports "This is not an inline equation".
8.3 Lines with tall equations
A line containing a tall equation — a fraction, an integral, a Σ with limits above and below — gets extra leading under auto leading, so the line spacing within the paragraph becomes uneven. If the page looks awkward even though the equation's vertical position is right, the cause is usually leading.
If a tall equation still touches the characters of the line above, it is often more natural on the page to set it as a display equation on its own line than to lower it with the vertical offset. Another option is to switch the limits of Σ or lim to "→ side" for that equation only, which reduces its height (see 7.6).
8.4 Reading the equation info box
When you select an equation in InDesign, an info box appears at the top of the panel. It has two lines.
| Line | What you see | Meaning |
|---|---|---|
| First line | The equation's LaTeX source | Beyond 60 characters it is shortened with …. This value is stored as plain text in the frame's label |
| Second line | Size 24.3 × 11.7pt | Actual width × height of the equation graphic. Shown in pt even if the document rulers are in mm |
text 10.5pt | Body text size at the spot where the equation sits. This is the reference for the automatic alignment | |
vertical 2.1pt | The anchor's vertical offset. Positive = up, negative = down |
For an equation placed freely outside a line of text, the second line reads Not inline (placed on the page).
9. Working with a whole document
Up to the previous chapter the subject was building one equation. This chapter is about handling a whole book. Converting all the equation source flowed in with a manuscript, counting every equation in the document, exporting them as a list, and re-rendering the whole document in one go after changing the typesetting settings — all of this happens in the "Document" section of the InDesign panel.
9.1 How the panel is laid out
From the top, the panel consists of one status line and then three sections.
| Section | What it is for | What is in it |
|---|---|---|
| Edit | Build or change a single equation | [Edit Equation] · quick-insert box + [Insert] · status line · information about the selected equation |
| Document | Handle the whole document (or a chosen text frame) at once | 2 scope buttons · [Place manuscript (Word · HWPX)] · [Convert $...$ equations] · [Re-render all equations] + size · [Count equations] · [Send list to editor] · [Export SVG] · [Export PNG] · [Export CSV] · [Redraw view] |
| Connection settings | Sets the channel to the editor, and vertical position | Folder [Change] · EXE [Choose] · Vertical offset (step · ▲ · ▼ · 0) · Language |
128 equations across 34 pages, Conversion finished — placed 42 · skipped 1 · failed 0 —
so always read this line after clicking a button.
9.2 Scope — whole document vs selected frame
The two buttons at the top of the "Document" section decide what the functions below them act on. The active one is shown darker. The default is whole document.
| Scope | Target | When to choose it |
|---|---|---|
| Scope: whole document | Every text frame in the document | Processing the whole book at once (default) |
| Scope: selected frame | The entire story of the text frame the text cursor is in (if several frames are threaded, the whole thread) |
Trying things out on just one chapter or one article |
The scope applies to the following six functions.
- [Convert $...$ equations]
- [Re-render all equations]
- [Count equations]
- [Send list to editor]
- [Export SVG] · [Export PNG]
- [Export CSV]
[Redraw view] always acts on the current document, whatever the scope.
Scope is "selected frame" — put the cursor in a text frame first and does nothing.
One click inside the text frame with the Type tool is all it takes.
9.3 The Edit section
[Edit Equation]
Opens the editor window to build or change an equation. It is the button you will click most in the panel.
- With the Type tool, click where the equation should go in your text (an inline equation). If nothing is selected, it is placed on the page.
- Click [Edit Equation] in the panel.
- The editor window opens. If it is already open, that window comes to the front and its content changes.
- Finish the equation and click [Id InDesign] in the editor.
- The panel places it in the document by itself. There is nothing more to click in the panel.
The panel passes a few things to the editor along with the request.
- The text size at that spot (
pointSize) and the font name — the editor uses them to work out the equation's dimensions and baseline depth. That is why the same equation comes out with a different size and sitting height in 9.5 pt text and in 11 pt text. - The equation's identifier (when an existing equation is being changed) — with it, the editor's status bar shows
re-edit mode, and on placing, the equation at that spot is replaced instead of a new one being added.
The quick-insert box + [Insert]
Short equations go in straight from the panel, without switching windows. It is the shortest route.
- Place the cursor in your text.
- Type the equation in the panel's quick-insert box.
- Enter or [Insert].
The box accepts both LaTeX and AsciiMath. You can type without backslashes, as in 1/2, x^2, sqrt(2),
or in LaTeX, as in \frac{1}{2}.
The editor renders it in the background and hands it back, so the quality is exactly that of an equation built with [Edit Equation] — it goes through the same vector PDF path.
Information about the selected equation
Click an equation in the document and an information box appears in the panel's Edit section. With nothing selected it disappears.
| Shown | Meaning |
|---|---|
| First line | The equation's LaTeX source (up to 60 characters, then …) |
Size 32.4 × 18.7pt | The real width × height of the equation's frame. Even if the document rulers are in mm, it is always converted to pt |
text 10.5pt | The size of the text where the equation sits |
vertical 8.2pt | How far it is raised from the text baseline (positive = up) |
Not inline (placed on the page) | An equation placed separately on the page rather than anchored in the text flow |
text value:
you see at once whether that equation inherited the wrong size. Clear up such spots in one go with "Re-render all equations".
9.4 Converting $equations$ in a manuscript
Instead of inserting equations one at a time, you write them as text in the manuscript and convert them all later. It is especially convenient when the author and the typesetter are different people — the author needs to know neither InDesign nor MyMath.
Rules for writing the manuscript
In the manuscript (Word, a text editor, anything), wrap each equation in dollar signs at the place it belongs.
The sum of the two roots of the quadratic $x^2-5x+6=0$ is $\frac{-b}{a}$.| Rule | Details |
|---|---|
| Within one line only | There must be no line break between $ and $. Write long equations on one line too |
| A real dollar sign | Write \$ and it is left alone rather than read as an equation (for example the price is \$100) |
| Empty content | An empty pair such as $ $ is skipped |
| Notation | Write the inside in LaTeX (\frac{a}{b}, x^2, \sqrt{2}) |
Bringing the manuscript into InDesign
- Create a text frame in InDesign and place the cursor in it with the Type tool.
- With Ctrl+D (Place), choose the manuscript file (
.docx, text saved from.hwp, and so on). - The text flows in. The
$…$parts are still just characters. - Sort out the text formatting (font, size, leading) first. Equations follow the text size at their spot, so formatting comes first.
Converting
- Set the scope (the first time, "selected frame" for just one article).
- Click [Convert $...$ equations].
- The panel scans the text, finds every
$…$and reads the text size at each spot. - The editor renders them one by one (if the editor is closed, the panel tries to start it automatically).
- The panel places the results from the end toward the beginning, because changing an earlier spot first would shift the positions of the later characters.
- When all are in, it recomposes the text and adjusts the vertical positions automatically.
Reading the result
When it finishes, the status line reads like this.
Conversion finished — placed 42 · skipped 1 · failed 0 · vertical correction ×2| Item | Meaning | What to do |
|---|---|---|
| placed | The number turned into equations | — |
| skipped | Spots whose characters changed while waiting for the render, so they were no longer $equation$ |
Do not touch the text during a conversion. Click the button once more and the remaining spots are handled |
| failed | Equations that could not be rendered at all (syntax errors and the like) | The $…$ is still there in the text. Find it and fix the source |
| vertical correction ×N | How many times baselines thrown off by the height of inline equations were corrected automatically (4 at most) | Normal behavior. It is not a problem if this item is absent either |
No $...$ found appears, it is usually one of three things —
① the scope is "selected frame" but the cursor is in a different frame
② a line break crept in between $ and $
③ autoformatting in the manuscript changed the dollar signs into some other character.
9.5 Re-render all equations
Re-renders the document's equations with the current settings and replaces them in place. Position, size and the surrounding characters stay as they are; only the graphic is swapped for a new one.
When to use it
- After changing equation sizes (script ratios and so on)
- After changing the thickness of fraction bars or radical lines
- After changing the print color (K100 · spot color · overprint)
- After changing the typefaces by category or the precision spacing
- After switching to a different style set
- When you have changed the body text size throughout and the equations look too large or too small
The size drop-down
The drop-down to the right of the button sets the size to re-render at.
| Value | What happens | When to use it |
|---|---|---|
| Auto (default) | Each equation follows the text size at its own spot | Documents with mixed text sizes — a spot in 10 pt body text and a spot in an 8 pt footnote each come out right |
| 8 · 9 · 9.5 · 10 · 10.5 · 11 · 12 · 14 · 16 | Every equation in the document is set to that size | Tidying up, in one go, a document whose equation sizes have become uneven |
| Custom… | A box appears beside it. Type a number from 1 to 127 pt and press Enter | When you need a size not in the list, such as 10.2 pt. Once confirmed it is added to the list and can be chosen again later |
Steps and results
- Set the scope and the size.
- Click [Re-render all equations].
- Status line:
Re-rendering 128 equations (following the surrounding text size) — the editor is working… - The editor renders them one by one. Progress is shown in the editor window too.
- At the end:
Re-render finished — replaced 126 · not found 2 · failed 0
| Item | Meaning |
|---|---|
| replaced | The number swapped for a new graphic in place |
| not found | Equations deleted or moved elsewhere after the list was made, so their spot could not be found |
| failed | Rendering or placing did not work at all |
Equations were found, but they have no identifier, so they cannot be replaced in bulk and does nothing.
Such equations have to be placed again one at a time.
No response from the editor — check that it is open and stops waiting.
Check that the editor window is open and that the exchange folder is the same on both sides, then click again.
9.6 Count equations
Tells you at once how many MyMath equations there are in the current scope, and across how many pages.
128 equations across 34 pagesClick it before and after a batch job to check that the numbers agree, or to estimate the amount of work.
If none are found, it says No MyMath equations found in this document.
9.7 Send list to editor + proofing check
Sends the list of every equation in the document to the editor's sidebar. It is the most useful function at the proofing stage.
- Click [Send list to editor] in the panel.
- Status line:
Sent a list of 128 equations — see "document equations" in the editor sidebar - The list appears, with page numbers, under "document equations" in the editor's sidebar.
- Click a line in the list and that equation comes to the canvas in re-edit mode.
- Change it, click [Id InDesign], and that spot in the document is updated. There is no need to find and click the equation in the document.
Proofing check
The [proofing check] in the editor's sidebar goes through the whole loaded list and marks only the equations with a problem, in red.
| Mark | Meaning | What to do |
|---|---|---|
| empty equation | It has no content | Delete it or fill it in |
| empty placeholder ⬚ | Unfilled input slots remain | Click to load it, fill the slots and place it again. This one leads straight to a printing accident |
| duplicate (of no. N) | Its content is identical to an earlier equation | Leave it if the repetition is intended. Fix it if it is a copying slip |
| render error | The source is broken and it cannot be drawn properly | Click to load it and fix the source |
At the end you see Proofing check done — 3 need review (red rows) or Proofing check done — everything looks fine ✅.
9.8 Export SVG · PNG
Saves the document's equations as images, one file per equation. Use it to carry the same equations over to web material or slides.
- Set the scope.
- Click [Export SVG] or [Export PNG].
- Choose the folder to save in.
- The editor renders them one by one and saves them in that folder.
- At the end:
Image export finished — 126 of 128 succeeded → (folder path)
| Format | Character | Use |
|---|---|---|
| SVG | Vector — stays sharp however much you enlarge it | Web pages, other editing programs |
| PNG | Image (at 300 dpi) | Word documents, slides, wherever an image is needed |
9.9 Export CSV
Finds every equation in the document and saves two list files. You choose the folder.
| File | Name | Purpose |
|---|---|---|
| CSV | <document name>-equations-<number>.csv | View, count and review in Excel |
| JSON | <document name>-equations-<number>.json | For other tools to read and process |
The CSV has the following five columns.
| Column | Contents |
|---|---|
| Page | The page number the equation is on |
| frameId | The equation's location identifier (used for bulk replacement) |
| LaTeX | The equation source — searchable and replaceable |
| Width (pt) | The width of the equation's frame (two decimal places) |
| Height (pt) | The height of the equation's frame (two decimal places) |
9.10 Redraw view
After an equation is placed inline, the text characters sometimes seem to disappear from the screen. It happens because the composition state is left stale, and this button revives it in three steps.
- Recompose that story.
- Recompose the whole document.
- Force the screen to redraw.
When it finishes, the status line shows what took effect (for example refreshed story+doc+redraw).
9.11 Connection settings
Folder
The folder through which the panel and the editor exchange files. There is nothing for you to set — when the panel starts it finds the standard location
(Documents\MyMath\exchange) and connects to it by itself, creating it if it does not exist.
- Open the panel.
- The status line shows
Exchange folder auto-connected: …and the path appears on the "Folder" row. - Only if you want to use a different folder, click [Change] and choose it yourself (
Exchange folder set: …).
Once connected, it stays connected when you quit and restart InDesign. If the automatic connection fails, the panel says so with the reason: Exchange folder not set — click [Change] · auto-connect failed: (reason).
Documents\MyMath\exchange yourself.
It must be the same folder the editor uses — the editor always uses this standard location. To find out why it failed, see the log files in chapter 14.
EXE
The location of the editor's program file. You can usually leave it empty — when you click [Edit Equation], the panel looks through the standard install locations in turn and starts the editor automatically.
Only if it cannot be found automatically, click [Choose] and point to the program file yourself.
In that case the status line shows ⚠ Editor is not responding (launch path not found), so you will know at once. You can also simply start the editor yourself — while it is open, the button reaches that window directly.
Vertical offset (▲ ▼ 0)
Inline equations sit on the baseline automatically. If one still looks slightly high or low to the eye, raise or lower that one equation by hand.
- Click the equation in the document. The display changes to something like
+8.2 pt (selected). - Choose the step —
1·0.5·0.25(default) ·0.1·0.05pt. - Click ▲ (up) or ▼ (down) and adjust by eye. Each click reports in the status line how many pt it actually moved.
- To undo, [0] — it returns to the standard automatic position.
| Shown | Meaning |
|---|---|
+8.2 pt (selected) | The actual vertical value of the selected equation (positive = up) |
Select an equation | No equation has been selected yet |
This is not an inline equation | The equation is placed separately on the page, so it has no baseline |
The step you choose is saved and used next time too. The vertical offset acts on that one equation only and has no effect on equations placed afterwards.
Language
The language of the panel's text. The default is Auto (InDesign language) — it follows the language InDesign is running in. Choose another language here and the panel changes at once, and the editor follows shortly (see "Language" at the end of chapter 10).
9.12 The re-editing flow
There are three ways to change an equation that is already placed. In all three, the spot and the surrounding characters stay the same and only the content changes.
| Way | How | When it is convenient |
|---|---|---|
| Pick it in the document | Click the equation → panel [Edit Equation] → change it and [Id InDesign] | Fixing the spot you are looking at right now |
| Pick it from the list | Panel [Send list to editor] → click under "document equations" in the editor's sidebar → change and place | Fixing several in a row · the proofing stage |
| All at once | [Re-render all equations] | Keeping the content and swapping only the typesetting settings |
When an equation is placed again, its spot is found in the following order.
- If the equation currently selected still exists, that spot is replaced.
- Otherwise the document is scanned for the identifier the editor sent along, and that spot is replaced.
- If neither is available, it goes in as a new equation (at the cursor, or on the page).
The graphic that is placed has an order of preference too — a vector PDF comes first, an SVG made by the editor second, and one drawn by the panel itself is the last safety net. In normal use it is always the first choice, the vector PDF, that goes in.
10. Preferences
Preferences is where you decide what your equations look like when drawn. Font size, typefaces, spacing, line thickness, print color — values that, once set, apply equally to every equation you make from then on are gathered here. That is different in kind from operations that touch a single equation (delimiter height in the properties panel, precision nudge and so on).
Opening it
- Click the ⚙ button at the right of the title bar.
- Or press Ctrl+;.
- Or use menu View → preferences.
From top to bottom, the dialog runs through the groups style set / equation size / font style by category / print color (separation) / line thickness / precision spacing / Korean font for text in equations / inline vertical position / appearance / Korean publishing options / tab order. Values are kept only when you click save at the bottom.
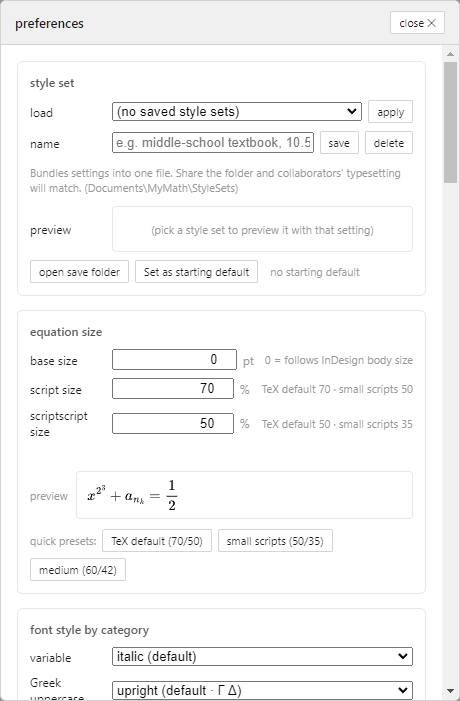
10.1 Style sets
A style set is all the values of Preferences stored in a single file. Use it when typesetting rules differ from book to book, or when several people share the work on one book. Pass the file around and everyone's equation typesetting comes out exactly the same.
What is stored
| Group | What is stored |
|---|---|
| Equation size | Base size · script % · scriptscript % |
| Line thickness | Fraction bar · radical rule |
| Print color | Black method · CMYK values · spot color name · alternate CMYK · overprint |
| Font style by category | All 13 categories + the User1 and User2 character lists |
| Precision spacing | The % values of the 12 MathJax parameters |
| Korean font for text in equations | Path and name of the font file |
| Inline vertical position | Auto baseline alignment · estimate alignment · ratio |
Buttons
| Button | What it does |
|---|---|
| The load list + apply | Choose a saved style set and apply it to the current settings. |
| name + save | Saves every value now shown in the dialog to a file under that name. |
| delete | Deletes the file of the style set chosen in the list. |
| open save folder | Opens the folder that holds the style sets in File Explorer. |
| Set as starting default | The editor starts with this style set every time. The chosen name is shown beside the button. |
| preview | Draws a real sample with the settings of the style set chosen in the list, so you can check the result before applying. |
Where the files are
Style sets are saved as .json files in the following folder.
~/Documents/MyMath/StyleSets/
- One person settles the typesetting rules and saves them as a style set.
- Open the folder with open save folder and hand out the
.jsonfile. - Each recipient puts the file in the same folder, chooses its name from the list in Preferences and clicks apply.
- To keep working under those rules, click Set as starting default.
10.2 Equation size
Sets the base size of equations and how much scripts shrink. How small scripts are set differs from publisher to publisher and book to book, so the values are left open for you to decide.
| Item | Unit | Range | Default | Description |
|---|---|---|---|---|
| Base size | pt | 0 – 200 (steps of 0.5) | 0 | 0 = follow the InDesign body text size. The text size at the spot being edited is read and the equation is drawn at that size. Any value other than 0 fixes the size regardless of the body text. |
| Script size | % | 10 – 100 (steps of 1) | 70 | The scale for one level down: what percentage of the base the 2 in x² is. |
| Scriptscript size | % | 10 – 100 (steps of 1) | 50 | The size of a script of a script (the 2 in x^{y^{2}}). It applies to every position two or more levels deep. |
Quick settings
| Button | Script / scriptscript |
|---|---|
| TeX default (70/50) | 70% / 50% |
| small scripts (50/35) | 50% / 35% |
| medium (60/42) | 60% / 42% |
The editing canvas follows the ratios set here too. The script size you see on screen and the script size that goes into InDesign are the same.
The status bar shows the current size, as in 10.5pt · script 50%.
Storage keys: mymath_size_base / mymath_size_script / mymath_size_scriptscript
10.3 Font style by category
The characters in an equation are divided by kind, and each kind is given its own letterform (upright, italic, bold, sans-serif, monospace). "Variables italic, digits upright, function names upright" is the basic rule of mathematical typesetting, but it varies a little from publisher to publisher. This is where you match those differences.
These are all 13 categories.
| Category | What it applies to | Available values | Default |
|---|---|---|---|
| Variable | Single letters such as x y z |
italic · upright · bold upright · bold italic · sans-serif · monospace | italic |
| Function name | sin cos log lim and so on |
upright · bold upright · italic · bold italic · sans-serif · monospace | upright |
| Greek uppercase | Γ Δ Ω |
upright Γ · italic 𝛤 · bold upright · bold italic · sans-serif · monospace | upright Γ |
| Greek lowercase | α β θ |
italic 𝛼 · bold | italic 𝛼 |
| Digit | 0–9 |
upright · italic · bold · sans-serif · monospace | upright |
| Operator | + − = < > × ÷ ≤ and so on |
default · bold | default |
| Vector | The letters inside \vec and \overrightarrow. The arrow itself does not change |
follow the variable setting · italic · upright · bold upright · bold italic · sans-serif · monospace | follow the variable setting |
| Body text | Characters inside \text{} — things like (단, x>0) |
normal · bold · italic · sans-serif · monospace | normal |
| Whole equation | Everything not caught by any category — delimiters ( ) [ ], punctuation, symbols such as ∞ ∂ ∠ |
default · bold | default |
| User1 | Only the characters you list in the User1 characters box below. Applied before the variable and digit rules | don't apply · italic · upright · bold upright · bold italic · sans-serif · monospace | don't apply |
| User2 | Characters not caught by User1 that are listed in the User2 box | don't apply · italic · upright · bold upright · bold italic · sans-serif · monospace | don't apply |
| Script box | Everything in a script position, like the 2 in x² or the i in xᵢ |
same as a normal box · italic · upright · bold upright · bold italic · sans-serif · monospace | same as a normal box |
| Scriptscript box | A script of a script (the 2 in x^{y^{2}}). Every position two or more levels deep |
same as a normal box · italic · upright · bold upright · bold italic · sans-serif · monospace | same as a normal box |
The User1 · User2 character boxes
In the two boxes below the category list, type the characters to apply the style to, run together (for example abc).
Commas and spaces count as characters too, so type the characters only.
Use them for rules such as "only the i j k used as vectors in this book are bold".
What is left alone
- Typefaces set directly in the equation — a group that already names a typeface, such as
\mathbf{v}, is left as it is. The inner setting takes precedence over the category rules. - Command names — the names of control sequences themselves, such as
\sinand\frac - Environment names —
\begin{pmatrix}and so on
\text{} becomes bold or slanted only on screen and in SVG.
The vector PDF placed in InDesign uses the outlines of the one Korean font chosen in 10.7.
If you give Hangul both bold and italic, only the inner one is applied.
- Upright, sans-serif and monospace Greek lowercase — the math font has no such glyphs.
- Sans-serif and monospace operators — it works for ASCII signs (
+) but not for named symbols (×≤), so the result is mixed. - Bold italic digits — the glyph shape is the same as bold, so there is no visible difference.
- Even with bold operators on, symbols with no bold glyph in the font, such as
∽ ≦ ≧, do not become bold. Also, the spacing around a unary minus (−1) may change to that of a binary operator.
Storage keys: mymath_stylecat_ + the category name
10.4 Script weight (make scripts a bit bolder)
This is a checkbox in the 🇰🇷 Korean publishing options group of Preferences.
| Item | Default | Description |
|---|---|---|
| make scripts a bit bolder (so they stay legible when shrunk) | Off | Wraps the content of script positions in bold so that it does not clog or fade in print. |
Scripts shrink to around half the body size, so at the same weight their strokes become thin on paper and can look faint. Some publishers use a heavier face for scripts than for the body, and this option serves the same purpose.
Positions where a weight has already been set (x^{\mathbf{2}} and the like) are left alone.
Switch it on or off and the result is drawn in the preview box just below.
Korean body-text presets
These are five buttons in the same group. Click one and the five values base size · script % · scriptscript % · fraction bar · radical rule change together.
| Preset | Base size | Script | Scriptscript | Fraction bar | Radical rule |
|---|---|---|---|---|---|
| middle-school textbook (body 10pt) | 10 pt | 60% | 45% | 0.35 pt | 0.7 pt |
| High-school textbook (body 9.5pt) | 9.5 pt | 60% | 45% | 0.35 pt | 0.7 pt |
| workbook (body 9pt, tight) | 9 pt | 55% | 40% | 0.30 pt | 0.6 pt |
| worksheet (body 11pt, large) | 11 pt | 70% | 50% | 0.40 pt | 0.8 pt |
| TeX default | 0 (follows body text) | 70% | 50% | 0 (auto) | 0 (auto) |
Storage key: mymath_subfont_bold
10.5 Print color (separation)
Decides what color the black of an equation is printed in. If you are making printed matter, this is the most important setting.
| Black method | What goes into the PDF | When to use it |
|---|---|---|
| Solid K100 (default · recommended) | DeviceGray 0 — the black plate alone | The right choice for equations mixed into body text. On separation they are drawn on the black plate only, so they are the same black as the body text and registration shifts cause no trouble. |
| Specify CMYK directly | The C M Y K values you give | When the printer asks for specific CMYK values. Each box takes 0–100%; the default is K 100 only. |
| Spot color (Separation) | A PDF Separation color space + alternate CMYK | When the color is to be output on its own spot plate. Give the spot color name (for example PANTONE 072 C) together with the four alternate CMYK values used on screen and in composites. |
| RGB | The RGB values as they are | Only for screen and web output. |
Overprint
| Item | Default | Description |
|---|---|---|
| Overprint | Off | Prints the black on top of the color beneath. With it off, the color beneath is knocked out where the black goes, and a slight misregistration leaves a white fringe around thin lines. It helps especially in equations with many thin elements such as fraction bars and radical rules. |
Storage keys: mymath_color_mode / mymath_color_cmyk /
mymath_color_spotname / mymath_color_spotcmyk / mymath_color_overprint
10.6 Line thickness
Sets the weight of fraction bars and radical rules in pt. These values affect print quality directly.
| Item | Unit | Range | Default | Description |
|---|---|---|---|---|
| Fraction bar | pt | 0 – 5 (steps of 0.01) | 0 = auto | The weight of the horizontal bar of the \frac family. |
| Radical rule | pt | 0 – 5 (steps of 0.01) | 0 = auto | The weight of the top line of \sqrt. |
The default (auto) is about 0.66 pt at 11 pt body text, which is on the heavy side for print. If you want thinner lines to match your book's typesetting rules, enter the values yourself.
A value entered in pt is converted internally to a proportion of the body size. So the lines keep the same relative weight when the body size changes.
Storage keys: mymath_sp_fracbar / mymath_sp_rootbar
10.7 Korean font for text in equations
Chooses the font in which Hangul inside an equation, such as (단, x>0), is drawn.
| Item | Description |
|---|---|
| find font | Type part of a name and the list below is filtered at once. Examples: Myungjo, Nanum, Batang |
| The font list | The Korean fonts installed on this computer. Eight rows show at a time, and it scrolls. |
| Count | Below the list, the number currently filtered and the total are shown. |
| Preview | Draws a real equation containing Hangul in the chosen font. |
How it works
When the editor starts, it goes through the system font folder and the user font folder,
checks whether each font file contains Hangul characters, and builds the list.
It reads .ttf · .otf · .ttc alike.
On output, MyMath takes the outline of each character directly from the chosen font file and draws it just like the other math symbols. As a result:
- The font does not have to be installed on the InDesign side. Equations go in as shapes, without referring to a font.
- The font is not embedded whole in the PDF, so documents do not grow heavy.
- Hangul is a vector path like any other symbol, so the solid K100 guarantee holds.
Storage key: mymath_hangul_font
10.8 Precision spacing
Fine-tunes the spacing between the parts of an equation. The items appear only after you click expand at the right of the group title.
10.8.1 Basic typesetting parameters (12 items, unit %)
Values are % of the default. 100 is the default state.
| Group | Item | What changes |
|---|---|---|
| Fraction | Numerator height | How far above the fraction bar the numerator sits |
| Denominator depth | How far below the fraction bar the denominator sits | |
| Fraction bar height | How far above the baseline the fraction bar itself is | |
| Script | Superscript height | How far superscripts rise |
| Subscript depth | How far subscripts drop | |
| Space after a script | The gap to the character that follows a script | |
| Italic correction | Horizontal correction for a script attached to a slanted letter | |
| Big operator | Limit gap (above) | Between the upper limit and the sign of ∑ ∫ |
| Limit gap (below) | Between the lower limit and the sign | |
| Limit padding | The padding outside the limits | |
| Delimiters | Delimiter growth factor | What % of the content the delimiters are grown to |
| Null delimiter width | The width kept when one side of a pair is empty |
Storage keys: mymath_fine_ + the item name
10.8.2 Spacing by structure (23 items)
From here on, the default is 0 (or 100%) = nothing added. Whatever you enter is added.
| Group | Item | Unit | Range | Default | Description |
|---|---|---|---|---|---|
| Matrix | Row spacing | em | −0.4 – 3 | 0 | Widens the gap between rows. Delimiter height grows to match |
| Column spacing | em | −0.4 – 3 | 0 | Widens the gap between columns. Vertical partition rules move along | |
| Partition rule thickness | % | 10 – 500 | 100 | The weight of the divider of an augmented matrix | |
| Partition rule horizontal overhang | em | −0.3 – 1 | 0 | The length a horizontal partition rule extends past the table left and right | |
| Partition rule vertical overhang | em | −0.3 – 1 | 0 | The length a vertical partition rule extends past the table top and bottom | |
| Delimiters | Horizontal padding | mu | −6 – 18 | 0 | Between the delimiter and the content. 18mu = 1em |
| Minimum width | em | 0 – 8 | 0 | If the inside is narrower than this, it is widened. 0 = no limit | |
| Vertical scale | % | 50 – 200 | 100 | The vertical size of \left … \right delimiters | |
| Maximum growth | % | 0 – 900 | 0 | Delimiters that exceed this size are reduced. 0 = no limit | |
| Script | Minimum gap above | em | −0.4 – 1 | 0 | Raises superscripts further (relative to the script size) |
| Minimum gap below | em | −0.4 – 1 | 0 | Lowers subscripts further | |
| Right-side length correction | mu | −3 – 12 | 0 | Space added after a script. It adds to "Space after a script" (%) above | |
| Fraction | Fraction overhang | em | −0.1 – 1 | 0 | The length the bar extends past the numerator and denominator on each side |
| Minimum gap, numerator side | em | −0.3 – 1 | 0 | Moves the numerator further from the center line | |
| Minimum gap, denominator side | em | −0.3 – 1 | 0 | Moves the denominator further below the center line | |
| Slashed fraction spacing | mu | −3 – 12 | 0 | The spacing around a fraction written with a slash, as in a/b | |
| Radical | Tail width | % | 50 – 250 | 100 | The horizontal size of the radical's tail. The content moves right by the same amount |
| Top line overhang | em | −0.2 – 1 | 0 | The length the radical's top line extends past the content on the right | |
| TeX automatic spacing | Around binary operators | % | 0 – 400 | 100 | Around + − × ÷ ± · (4mu by default) |
| Around relations | % | 0 – 400 | 100 | Around = < > ≤ ≥ ≠ ≡ (5mu by default) | |
| After punctuation | % | 0 – 400 | 100 | After commas and semicolons (3mu by default) | |
| Around function names | % | 0 – 400 | 100 | Around function names such as sin cos log lim (3mu by default) | |
| Between function letters | em | −0.08 – 0.4 | 0 | The letterspacing between s·i·n in sin |
mu is the spacing unit used in mathematical typesetting: 18mu = 1em.
At 10 pt body text, 1mu ≈ 0.56 pt.
Storage keys: mymath_spadv_ + the item name
10.8.3 Spacing by pair (25 pairs + 1 option)
The elements of an equation are divided into ten kinds, and spacing is adjusted separately according to which kind follows which.
Where "TeX automatic spacing" in 10.8.2 is a % per kind,
here you can give a different value to each adjacent pair. Values are offsets in mu, and all defaults are 0.
| Kind | What belongs to it |
|---|---|
| Ordinary character | Single letters and symbols such as x, α |
| Digit | 0–9. A run of digits with a decimal point counts as one item |
| Binary operator | + − × ÷ ± ⋅ (except when used as a sign) |
| Relation | = < > ≤ ≥ ≠ ≡ ∈ ⊂ → |
| Opening delimiter | ( [ \{ |
| Closing delimiter | ) ] \} |
| Punctuation | , ; : |
| Function | Operator names such as sin log lim ∑ ∫ |
| Group | Fractions, radicals, matrices, \left…\right |
| Term with a script | Anything with ^ or _ attached, such as x² |
These are the 25 pairs you can adjust. "Default" is the spacing normally inserted at that spot.
| Group | Pair | Default | Example |
|---|---|---|---|
| Around binary operators | Ordinary character → binary operator | 4mu | Between a and + in a+ |
| Binary operator → ordinary character | 4mu | Between + and b in +b | |
| Digit → binary operator | 4mu | Between 2 and + in 2+ | |
| Binary operator → digit | 4mu | Between + and 3 in +3 | |
| Group → binary operator | 4mu | Before a + that follows a fraction or radical | |
| Binary operator → group | 4mu | Before a fraction or radical that follows a + | |
| Closing delimiter → binary operator | 4mu | Between ) and + in )+ | |
| Term with a script → binary operator | 4mu | Between x² and + in x²+ | |
| Around relations | Ordinary character → relation | 5mu | Between a and = in a= |
| Relation → ordinary character | 5mu | Between = and b in =b | |
| Digit → relation | 5mu | Between 2 and = in 2= | |
| Relation → digit | 5mu | Between = and 3 in =3 | |
| Group → relation | 5mu | Before an = that follows a fraction | |
| Relation → group | 5mu | Before a fraction or matrix that follows an = | |
| Term with a script → relation | 5mu | Between x² and = in x²= | |
| Function names | Ordinary character → function | 3mu | Before a function name, as in x sin |
| Function → ordinary character | 3mu | After a function name, as in sin x | |
| Function → opening delimiter | 0 | Between the function and the parenthesis in sin( | |
| After punctuation | Punctuation → ordinary character | 3mu | , x between the comma and the letter |
| Punctuation → digit | 3mu | , 2 between the comma and the digit | |
| Around groups | Ordinary character → group | 3mu | Before a fraction or radical that follows x |
| Group → ordinary character | 3mu | Before an x that follows a fraction or radical | |
| Spots that are normally 0 | Digit → ordinary character | 0 | 2x between the coefficient and the letter |
| Ordinary character → ordinary character | 0 | ab between letter and letter | |
| Term with a script → ordinary character | 0 | x²y between the scripted term and the next letter |
The last three pairs are spots where the spacing is normally 0. Give them a value and you can set the coefficient and the letter of 2x slightly apart,
or open up the letterspacing between letters, to match the typesetting taste of your book.
The comma-decimal option
| Item | Default | Description |
|---|---|---|
| Treat a comma between digits as a decimal point | Off | When on, 3,14 is set tight like a European decimal. In mixed expressions, real decimal points and the commas between function arguments are left alone. |
^ and _) separate typesetting rules apply, so pair spacing is not applied there.
Storage keys: mymath_spmat_ + the pair name
10.8.4 Resetting
| Button | What it resets |
|---|---|
| set all to 100% | The 12 items of 10.8.1 |
| reset precision spacing | The items of 10.8.2 · 10.8.3 |
10.9 Appearance
Changes the look of the symbols themselves. These settings stretch and slant the glyph shapes; they are not about size or position.
Space width
| Item | Unit | Range | Default | Description |
|---|---|---|---|---|
| Space width | % | 10 – 400 (steps of 5) | 100 | Widens or narrows, all at once, the width of spacing commands such as \, and \quad. |
Sigma shape
| Item | Choices / range | Default | Description |
|---|---|---|---|
| Sigma shape | Default (Western) · narrow, slanted shape · specify directly | Default | The overall shape of the ∑ sign. With "specify directly", the three boxes on the right are used. |
| Horizontal | 50 – 200% (steps of 5) | 100 | Horizontal scale of ∑ |
| Vertical | 50 – 200% (steps of 5) | 100 | Vertical scale of ∑ |
| Slant | −30 – 30° (steps of 1) | 0 | The angle by which ∑ is slanted |
Integral sign
| Item | Range | Default | Description |
|---|---|---|---|
| Slant | −30 – 30° (steps of 1) | 0 | The angle by which ∫ is slanted |
| Vertical | 50 – 200% (steps of 5) | 100 | Vertical scale of ∫ |
Arrowhead
| Item | Choices / range | Default | Description |
|---|---|---|---|
| Arrowhead | Default · redraw the head (keep the box width) | Default | With "redraw the head", the arrowhead is drawn anew. The horizontal width it occupies is left unchanged, so the spacing before and after is not disturbed. |
| Head height | 50 – 200% (steps of 5) | 100 | The height of the arrowhead |
- Double-line arrows (⇒ ⇔) are not changed. They have two shafts, so they cannot be redrawn by the same method.
- The "narrow, slanted shape" of the sigma is an approximation made by narrowing and slanting the same glyph. It is not a swap to a different typeface.
Change a value and the result is drawn at once in the preview box below the group. The transformations added here carry over exactly to the vector PDF, and the solid K100 guarantee holds.
Storage keys: mymath_appear_ + the item name
10.10 Inline vertical position · tab order
10.10.1 Inline vertical position
Where an equation placed inside a line of text sits vertically is decided automatically by the InDesign panel. It matches the vertical center of the equation to the visual center of the body text and then corrects it once more with a value actually measured on the page after placing (see chapter 8 for details).
Storage keys: mymath_align_autobaseline / mymath_align_enable / mymath_align_divisor
10.10.2 Tab order
Decides which slot the cursor goes to first when you press Tab inside a fraction.
| Choice | The order Tab travels in | Default |
|---|---|---|
| Western — numerator first | Numerator → denominator → out of the fraction | Default |
| Eastern — denominator first | Denominator → out of the fraction |
Korean and Japanese typesetting practice visits the denominator first. It matches the order in which a fraction is read aloud in those languages (denominator first), and some people find that it makes the flow of typing more natural.
Storage key: mymath_cursor_order
10.11 Color styles
Color styles are managed not in the Preferences dialog but in a separate window. Open it with 🎨 color style in the ribbon, or from the menu bar.
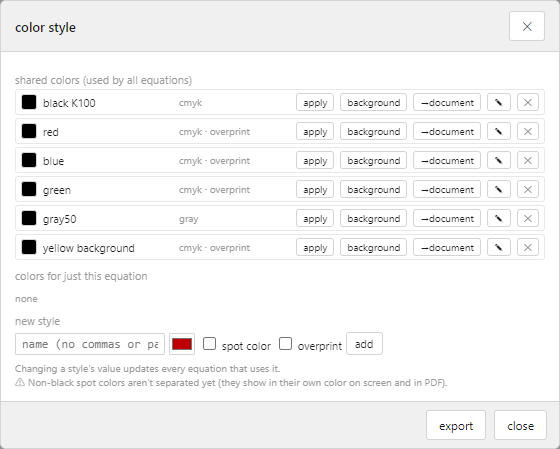
What is different
When you pick a color directly with the color picker, that color value stays in the equation. With a color style, only the name stays in the equation, and on output it is replaced by the actual color of that name.
So when you change the value of a style, every equation that uses it changes along with it, all at once. When the request comes in to "change this book's answer color from red to blue", you change one style instead of fixing the equations one by one.
The two lists
| List | Scope |
|---|---|
| Shared colors | Used by all equations. This is the one you can hand out to a team. |
| Colors for just this equation | Temporary colors used only in the equation you are working on. |
Every item has →document / →shared buttons for moving it between the two lists.
Styles included by default
| Name | Color model | Value | Notes |
|---|---|---|---|
| black K100 | CMYK | 0 / 0 / 0 / 100 | The same solid black as body text. On separation it is drawn on the black plate only |
| red | CMYK | 0 / 90 / 86 / 0 | |
| blue | CMYK | 100 / 72 / 0 / 0 | |
| green | CMYK | 85 / 10 / 100 / 0 | |
| gray50 | Gray | Lightness 0.5 | 0 is black, 1 is white |
| yellow background | CMYK | 0 / 5 / 60 / 0 | A pale background for highlighting an equation |
The buttons on each item
| Button | What it does |
|---|---|
| apply | Gives that color to the current selection (or to the whole equation if there is none) |
| background | Applies it as the background color rather than the text color |
| →document / →shared | Moves it to the other list |
| ✎ | Edits the name, color value, spot color and overprint |
| ✕ | Deletes the style |
Each row of the lists also shows, beside the name, whether it is a spot color and whether overprint is set. With export at the bottom of the window you can write the list of styles to a file.
Making a new style
- Type a name in the new style box at the bottom of the window.
- Set the color model and the values.
- If needed, tick the spot color · overprint checkboxes.
- Click add.
{ } \ $ % # [ ] : ~ ^ _ & < > " ' ` | ; cannot be used.
These characters have a meaning in equation syntax, and an equation breaks if they get into a name. Names can be up to 40 characters long.
Storage keys: mymath_colorstyles_app (shared) / mymath_colorstyles_doc (just this equation)
10.12 Stretchy integral
A function that stretches the integral sign to match the height of the content beside it. Choose Stretchy integral… from the menu bar or the ribbon and set it in its own window.
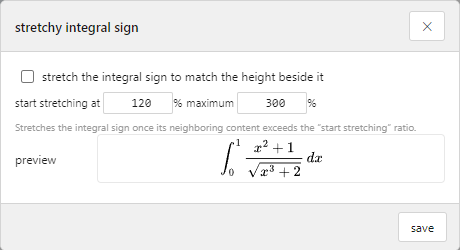
By default ∫ has a fixed size, so when the integrand is vertically large, like a fraction or a radical, the integral sign looks small by comparison. With this function on, the sign grows to follow — only in those cases.
| Item | Unit | Range | Default | Description |
|---|---|---|---|---|
| stretch the integral sign to match the height beside it | — | On / off | Off | Switches the whole function on and off. |
| start stretching at | % | 100 – 400 (steps of 10) | 120 | Stretching starts when the overall height of the equation exceeds this ratio of the integral sign's height. The lower the value, the more often it stretches. |
| maximum | % | 100 – 600 (steps of 10) | 300 | However tall the content, this scale is never exceeded. |
Signs it applies to
Not only the single integral ∫ but all six kinds — double and triple integrals and the contour and surface integral family.
The transformation added here carries over exactly to the vector PDF. The stretched shape you see on screen is what goes into InDesign.
Storage key: mymath_varint
Language
The panel and the editor follow the language of InDesign. With a Korean InDesign they appear in Korean, with an English InDesign in English.
| What you want to change | Where |
|---|---|
| The panel and the editor together | Language at the bottom of "Connection settings" in the InDesign panel. The panel changes at once, and the editor follows shortly |
| The editor only | Editor menu View → Language. The language chosen here takes top priority |
| Back to the original | Auto (InDesign language) in both places |
Supported languages: English · 한국어 · Deutsch · Français · 日本語 · Español · 简体中文 · Português · Italiano · Русский. With an InDesign in a language that has no translation, they appear in English.
11. Import and export
MyMath reads 7 formats and writes 20. Reading is there so that equations you have already built are not lost; writing is there to carry equations to print, the web, documents and other editing programs.
11.1 Formats you can import
Open them with [📂 import file] in the ribbon's "import" group, or from the "File" menu. You can choose several files at once.
| Format | Extension | How it is read | Limits |
|---|---|---|---|
| .mmf equation files | .mmf .mmc |
The file structure is decoded and turned into LaTeX. Files containing Korean text are read with the right encoding | The symbol-number table is not complete. Places that are not recognized are left as [S378] and the like, and collected in the report (see 11.3) |
| MathML | .mml .mathml .xml |
Standard MathML elements are turned into LaTeX. Unicode symbols and named entities (α and so on) are handled too |
Elements that are not handled leave a □ or [element name] in their place and are reported |
| Equations inside EPS · PDF | .eps .pdf |
Finds and reads the <math>…</math> block embedded in the file.
It copes with a % comment mark on every line and with continued line ends |
Nothing can be recovered from a picture file that has no equation data embedded in it (no equation data found) |
| AsciiMath | .txt .am |
Plain-text math notation without backslashes. A tokenizer and a recursive parser read it, nesting included | Unknown tokens are left as \text{[?…]} and reported |
| Word equations (OMML) | Paste · XML fragment | Fractions, radicals, big operators, delimiters, matrices, alignment, functions, limits, accents, overbars, groups, borders, phantoms and more are carried over | The .docx file itself is not opened here — copy the equation in Word and paste it (11.2) |
| MediaWiki | Paste · .html |
What is inside <math>…</math> is already LaTeX. Only the wiki-specific commands are replaced |
A few commands that mean something else on the wiki (for example superset and supremum) are brought into line with the standard |
| HTML | .html |
Finds every MathML block in the document | Equations that exist only as pictures cannot be read |
annotation), it is used as is.
No conversion takes place, so nothing at all is lost. The report marks it as original TeX.
The EPS and PDF files MyMath writes carry the original with them (11.6), so they are always read back by this route.
Importing, step by step
- Ribbon "import" → [📂 import file].
- Choose one file or several.
- The first equation appears on the canvas and the import report opens.
- Click another line in the report's list and that equation comes to the canvas.
11.2 Smart paste (Ctrl+Shift+V)
MyMath looks at the contents of the clipboard, works out what format they are in, and pastes accordingly. You do not have to choose a format.
| Clipboard contents | Clues it recognizes | Result |
|---|---|---|
| Word equation (OMML) | The <oMath> tag | Converted to LaTeX and inserted. The number of unknown elements is reported as well |
| MathML | <math> · <mrow> · <mfrac> | Converted to LaTeX and inserted |
| MediaWiki | Wiki notation inside <math> · {{math|…}} | Converted to LaTeX and inserted |
| .mmf source | The file's internal markers | Converted to LaTeX and inserted |
| LaTeX | Control sequences · $…$ · ^{ · _{ | The surrounding $ or \begin{equation} is stripped and the rest inserted as is |
| AsciiMath | sqrt( · sum_ · +- · xx · oo · [[ | Converted to LaTeX and inserted. The number of unknown tokens is reported too |
| Plain text | Only digits, Latin letters and operator signs | Inserted as is |
After pasting, the status line says what the contents were recognized as — Detected format: AsciiMath — pasted.
If it cannot tell, it says so — couldn't detect the format, treated as LaTeX — and inserts the text as is.
.docx file.
11.3 Reading the import report
When an import finishes, a results window opens. It is a principle of MyMath that nothing unrecognized is passed over in silence.
| Area | Contents |
|---|---|
| Top line | 12 file(s) · carried over as-is 9 · needs review 3 |
| File list | File name / how it was read (.mmf · MathML · original TeX) /
badge (as written or needs review N) / the beginning of the LaTeX.
Click a line and that equation comes to the canvas |
| Unrecognized code | Kind and count, most frequent first, as in symbol 523 ×4. The kinds are symbol, template, variant, command, element, character and entity |
| Notice | Read failures, conversion failures, remarks |
Inside the equation, every unrecognized place keeps a visible marker such as [S523].
It is neither deleted nor quietly swapped for some other symbol, so you can see at once what needs attention.
Extending the symbol table
Symbol numbers are internal to the original program, so they cannot be worked out from the file alone. MyMath is therefore built so that once you have checked a number and written it down, it is converted automatically from then on.
- Click [open symbol table] at the bottom of the report.
Documents\MyMath\mmf-symbols.jsonopens. - Check in the original program which symbol that number stands for.
- Write the number and its LaTeX as a pair in the file.
{ "523": "\\clubsuit", "60": "\\angle" } - Save; it takes effect from the next import. The report confirms it with
entries registered now: N.
11.4 Copy as…
Ribbon "export" → [📋 copy as…]. It shows 12 formats, each with a preview of the result. You can see what will be pasted before you choose, so nothing gets pasted by mistake.
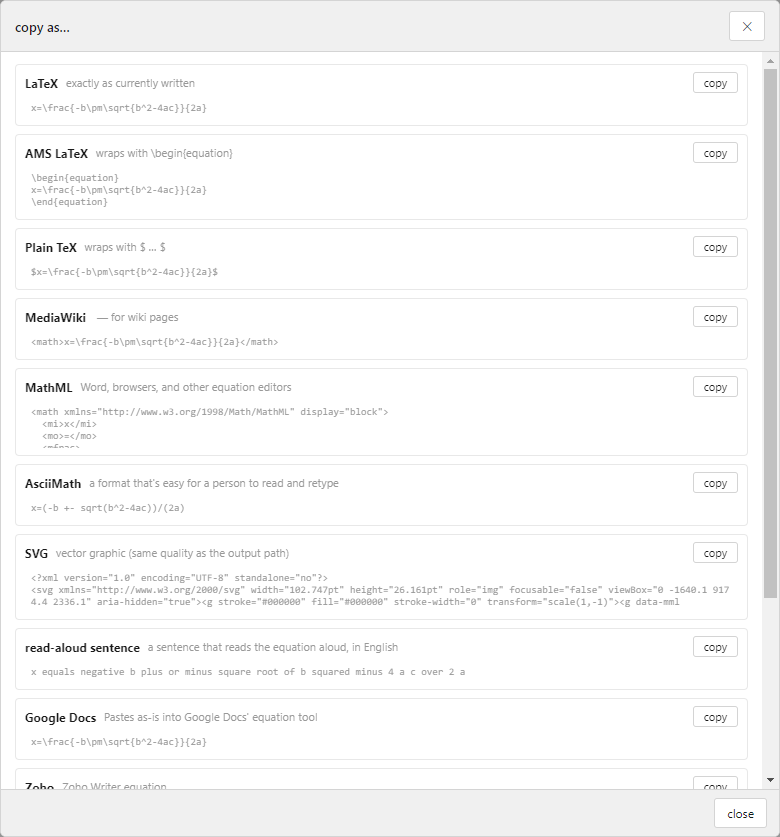
| Format | Where you paste it | Notes |
|---|---|---|
| LaTeX | Other math tools, notes, manuscripts | The format you are working in, unchanged |
| AMS LaTeX | Typesetting academic papers | Wrapped in \begin{equation} |
| Plain TeX | Equations within running text | Wrapped in $ … $. Use it as is for the $equation$ manuscript method (9.4) |
| MediaWiki | Wiki pages | <math> … </math> |
| MathML | Word, browsers, other equation editors | The standard format. It can be read back too |
| AsciiMath | Plain-text manuscripts, forums, email | Easy for a person to read and retype |
| SVG | Web pages, image editors | Made by the real output path — the same quality as what goes into InDesign |
| Read-aloud sentence | Accessibility alt text, scripts for narration | A sentence that reads the equation out (for example minus b plus or minus root … over 2 a) |
| Google Docs | The Google Docs equation tool | Commands it does not know (spacing, environments, \left\right and so on) are removed beforehand to raise the chance of a clean paste |
| Zoho | Zoho Writer equations | Goes through the same cleanup |
| MS Word equation | The Word equation editor | Written in the format Word reads directly |
| EPS (vector) | Printers that accept only EPS | The original equation is carried inside as well (11.6) |
11.5 Saving as an image
Ribbon "export" → [🖼 save image]. Where the vector formats (PDF, SVG, EPS) are for print, these are for the web, slides and Word.
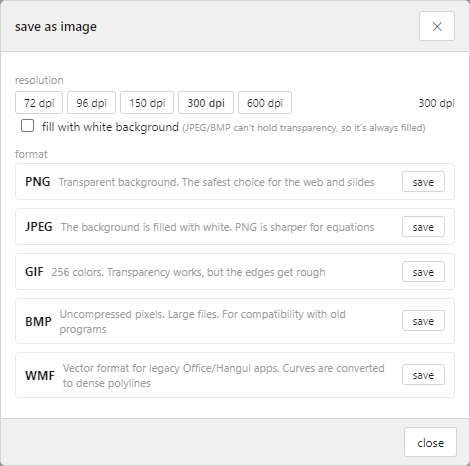
Resolution
Choose from 72 · 96 · 150 · 300 · 600 dpi. The default is 300 dpi; the dialog opens with the default resolution you set under "import/export settings".
| Resolution | Use |
|---|---|
| 72 · 96 dpi | Screen only — web pages, on-screen presentations |
| 150 dpi | Quick printouts, drafts |
| 300 dpi | Printed Word documents and handouts (the recommended default) |
| 600 dpi | When the image will be greatly enlarged. Files become very large |
Format
| Format | Transparent background | Character · use | Limits |
|---|---|---|---|
| PNG | Yes | Transparent background. The safest choice for the web and slides | — |
| JPEG | No | A compressed format meant for photographs | The background is filled with white. Equations are mostly lines, so PNG is sharper |
| GIF | Yes (limited) | 256 colors. Transparent background supported | It cannot hold partial transparency, so edges become rough. The body of each glyph is the same as in PNG |
| BMP | No | Uncompressed raw pixels. For compatibility with old programs | Large files. The background is filled with white |
| WMF | — | Vector. Practically the only legacy route by which old Office versions and the Hangul word processor accept vectors. Independent of resolution | Curves become fine polylines (corners may show at high magnification) · color goes out as a single solid color, so accent colors are not kept · Korean text inside the equation is left out, with a warning |
Fill with white background
Tick it to fill the background with white. JPEG and BMP cannot hold transparency, so they are always filled.
On saving, the actual pixel size is shown as well — PNG saved (412×186px): (path).
For WMF the number of points is shown instead of pixels — WMF saved (3184 points): (path).
11.6 Exporting as vectors
Three formats that stay sharp at any magnification and can be used for print.
| Format | Where you export it | Characteristics |
|---|---|---|
| Ribbon [📕 PDF] · the "File" menu · [save as PDF] in print preview | A vector PDF that fits the equation exactly. Black is K100 only. Glyphs are drawn as outlines, so it looks the same everywhere without any fonts installed (chapter 12) | |
| EPS | [copy as…] → EPS | The same computed result as the PDF, rewritten as PostScript commands, so the coordinates do not differ by a hair.
With K100 it uses 0 setgray and nothing else. For printers that accept only EPS |
| SVG | [copy as…] → SVG · the panel's [Export SVG] | Vectors for the web and other editing programs |
Carrying the original equation along
With include the original equation in exported files switched on under "import/export settings", the equation's original source (MathML and LaTeX) is written into the EPS alongside the drawing.
11.7 File-name macros
When you export many equations at once, names are generated from a rule. Type it in the "file name when exporting multiple" box of the ribbon's [⚙ import/export settings]; click a macro below and it is inserted into the name box. The result is shown live just underneath.
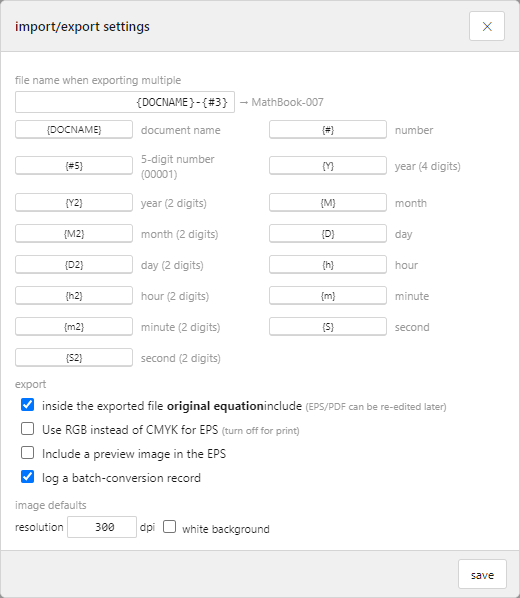
| Macro | Meaning | Macro | Meaning |
|---|---|---|---|
{DOCNAME} | Document name | {D} | Day |
{#} | Number | {D2} | Day, 2 digits |
{#5} | Number, 5 digits (00001) | {h} | Hour |
{Y} | Year, 4 digits | {h2} | Hour, 2 digits |
{Y2} | Year, 2 digits | {m} | Minute |
{M} | Month | {m2} | Minute, 2 digits |
{M2} | Month, 2 digits | {S} | Second |
{S2} | Second, 2 digits | ||
As in {#5}, the number after # is the number of digits. {#3} gives 007.
| What you type | Resulting name (document = MathBook, 7th equation) |
|---|---|
{DOCNAME}-{#3} (default) | MathBook-007 |
{Y}{M2}{D2}_{#5} | 20260803_00007 |
eq{#} | eq7 |
Other settings in the same window
| Setting | What it does |
|---|---|
| Include the original equation | Lets you edit the EPS or PDF again later (on by default) |
| Use RGB instead of CMYK for EPS | Always off for print work (off by default) |
| Include a preview image in the EPS | Adds the low-resolution picture that is shown on screen when the EPS is placed |
| Log a batch-conversion record | Writes a log file when many are exported at once (on by default) |
| Image defaults — resolution · white background | The values [save image] opens with (300 dpi by default) |
11.8 Equation files (.mymath)
Keep a single equation as a file, and open and save it. Not only the LaTeX but the current typesetting settings (style set · appearance · script weight) are stored with it, so when you open it later it is reproduced exactly as it was.
| Action | Shortcut | What it does |
|---|---|---|
| Open | Ctrl+O | Opens a .mymath file. The settings stored in it are applied too |
| Save | Ctrl+Alt+S | Overwrites the same file |
| Save As | Ctrl+Shift+S | Saves to a new file |
| Close equation | Ctrl+W | Clears the canvas (asks once if there is content) |
This isn't an equation file or unrecognized format
and leaves the canvas untouched.
Converting many files at once
Convert equation files in the "File" menu — choose several files in older formats and save them all at once as .mymath.
Use it when moving a whole collection of older equations over.
- "File" menu → convert equation files.
- Choose the files to convert (.mmf files, MathML, and equations inside EPS or PDF all work).
- Confirm where each file is saved. Only the extension of the original name changes, to
.mymath. - Progress is shown as
Converting equation files 3/12 (3 succeeded). - At the end:
Equation files converted — 11 succeeded · 1 failed (file name — no equation)
The reason for a failure is shown as one of three — read failed (the file could not be read) · no equation (no equation data inside) · save failed.
11.9 Print preview · print
Shows the equation in the middle of a sheet of paper. It is for judging how large the equation is on a real page. "File" menu → print preview (Ctrl+P).
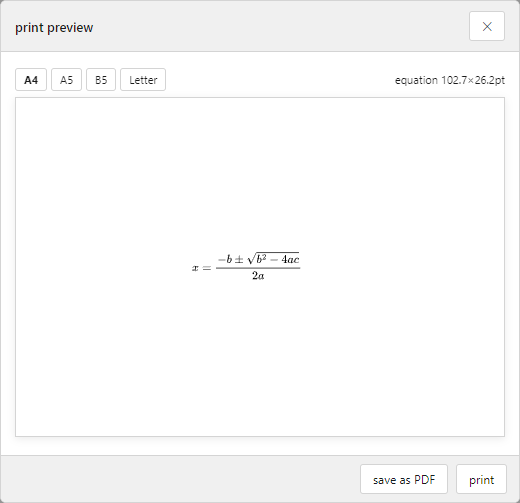
| Item | What it does |
|---|---|
| Paper | A4 · A5 · B5 · Letter. Your choice is kept for next time |
| Equation size | At the top right, equation 48.2×22.6pt — the dimensions that actually go out |
| [save as PDF] | Saves a vector PDF (11.6) |
| [print] | Prints on the connected printer |
12. Print quality
This chapter is about producing data you can hand to the printer. Looking right on screen and printing without accidents are two different problems.
12.1 Why this tool suits print
| Item | What the tool does | What changes in print |
|---|---|---|
| Vector | Draws the equation with lines and fills, not as a picture (pixels) | However much it is enlarged, the edges never break into steps. The full resolution of the press is used |
| Single K100 | Draws black on the black plate only | It is the same black as the body text. It never mixes with four-color black, where four plates overlap |
| No fonts needed | Draws glyphs as outlines | You never have to ask the printer or a contractor to install a special math font. No accident where a missing font changes the shapes |
| No links | Keeps the equation inside the document | Handing over the document alone is enough. No accident where a "missing link" sends an equation out at low resolution |
| The source stays with it | Stores the equation's notation together with it, in place | You can edit it again years later. Search and replace work too |
12.2 Four ways to handle black
Choose under "print color (separation)" in Preferences. Your choice applies to every equation you place.
| Mode | What goes into the PDF | In separations | When to choose it |
|---|---|---|---|
| K100 (default · recommended) |
Gray color space, value 0 (fill 0 g · stroke 0 G) |
Drawn on the black plate only | Nearly always. Ordinary print work that needs the same black as the body text |
| CMYK, direct | Four values you specify (fill k · stroke K, default 0/0/0/100) |
Split across the four plates exactly as specified | When the printer prescribes particular CMYK values. When you deliberately want a rich black |
| Spot color (Separation) |
A Separation color space plus an alternate CMYK transform ( /CS0 cs 1 scn) |
Goes out on one dedicated plate | Special jobs that print only the equations in a spot color. You set the spot color name and its alternate CMYK yourself |
| RGB | Red, green and blue values ( 0 0 0 rg) |
Becomes four-color black during conversion | Screen and web only. Never use it for print |
⚠️ RGB becomes 4-color black when separated. Use K100 for equations mixed into printed body text.Four-color black is printed with four overlapping plates, so the slightest misregistration puts a colored fringe around the glyph edges. Next to body text (one black plate) the color also looks noticeably different. This is the most common cause of printing accidents.
What happens to accent colors
An accent color (red, say) given to part of an equation is handled separately from black.
- With CMYK or spot color, accent colors are also converted to CMYK. Left as RGB, there would be no telling how they separate.
- With K100 or RGB, accent colors go out exactly as given.
- In every mode, pure black always goes out as black alone — it is handled separately so that conversion never turns it into four-color black.
12.3 Overprint
The overprint option under "print color" in Preferences. When on, black is printed on top of the plates below without knocking them out.
| State | What happens |
|---|---|
| Off (default) | The other plates under the black are knocked out. With misregistration, a white fringe around thin lines may show |
| On | Nothing is knocked out; black prints over. Slight misregistration produces no white fringe |
Equations are full of very thin lines — fraction bars, radical rules, matrix partition rules — so the difference shows. On pages with a tinted background (equations inside a colored box, for instance), turning it on is the safer choice.
12.4 Line thickness
Set in pt under "line thickness (print quality)" in Preferences. 0 means automatic (the engine's default).
| Item | Range | Default | Reference value |
|---|---|---|---|
| Fraction bar | 0 – 5 pt (steps of 0.01) | 0 = automatic | 0.35 |
| Radical rule | 0 – 5 pt (steps of 0.01) | 0 = automatic | 0.7 |
The pt value you set is applied as a proportion of the body text size. That is why lines give the same impression where the text is 9 pt and where it is 14 pt.
12.5 Hangul inside equations
Hangul inside an equation ((단, x는 자연수) and the like) is not in the math font, so it needs special handling.
MyMath takes the outlines of those characters directly from an installed font and draws them just like any other symbol.
- The font is not embedded whole, so the document stays light and there is no font to send to the printer.
- Choose the font under "Korean font for text in equations" in Preferences. You can search by name.
- If the chosen font lacks some characters, the number of missing characters is reported.
12.6 Checks when exporting PDF/X-1a
Things to check when you export a print PDF from InDesign (Ctrl+E → Adobe PDF (Print)).
| Item | What to check |
|---|---|
| Preset | [PDF/X-1a:2001] — if the printer prescribes one, follow that |
| Standard | PDF/X-1a:2001 |
| Output — color conversion | Convert to destination. The destination is the profile the printer prescribes |
| Marks and bleeds | Crop marks and bleed as the printer instructs |
| Image compression | Equations are vector, so the compression settings do not affect them |
What to check after exporting
Open the exported PDF in Acrobat's Output Preview.
- Separations — do the equations disappear when only the black plate is switched off? If so, K100 is correct. If equations still show on other plates, they have become four-color black.
- Fonts — the font list in the document properties should contain no math font. Equations are outlines and use no fonts. Only the body text fonts should appear.
- Images — there should be no pixel images where the equations are. Everything must be vector.
- Magnify — the edges should stay smooth even when an equation is enlarged to 800% or more.
12.7 Checklist before handing over to the printer
In the editor
- ☐ Print color is set to K100 (or the mode the printer prescribed)
- ☐ It is not set to RGB
- ☐ If equations contain Hangul, a Korean font is chosen
- ☐ Line thickness is not excessively thin (not below 0.2 pt)
- ☐ Overprint has been decided together with the printer
- ☐ The style set in use is saved (so the next volume gets the same typesetting)
In the InDesign panel
- ☐ The number of equations was checked with [Count equations]
- ☐ [Send list to editor] → the editor's proofing check reports everything fine (in particular, not a single empty slot ⬚)
- ☐ If settings were changed, [Re-render all equations] was run
- ☐ The vertical position of inline equations was looked over
- ☐ The document is saved
In the exported PDF
- ☐ With only the black plate left, the equations show; on the other plates they do not
- ☐ No math font in the font list
- ☐ No pixel images where the equations are
- ☐ Smooth even at high magnification
13. Keyboard shortcuts
The shortcuts of the MyMath editor come in four kinds: menu shortcuts (shown beside the menu items) · template shortcuts (insert a structure directly) · two-step shortcuts (first choose a family, then choose the symbol with the next key) · and editing helpers.
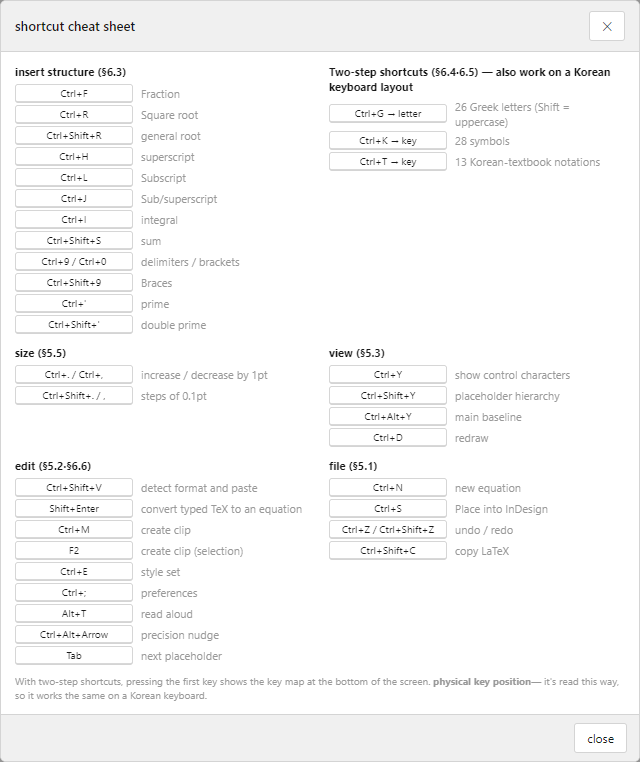
KeyG.
So you can use every shortcut without switching input mode.
The two-step shortcuts and the view and template shortcuts all work the same way.
13.1 File
| Shortcut | What it does |
|---|---|
| Ctrl+N | New equation |
| Ctrl+O | Open (a .mymath equation file) |
| Ctrl+W | Close equation |
| Ctrl+Alt+S | Save |
| Ctrl+Shift+S | Save as |
| Ctrl+S | Place in InDesign |
| Ctrl+Shift+E | Copy as… (LaTeX, MathML, AsciiMath and more) |
| Ctrl+P | Print preview · print |
| Ctrl+Q | Quit |
Importing equation files, batch-converting equation files and saving as an image have no shortcut; run them from the "File" menu.
13.2 Edit
| Shortcut | What it does |
|---|---|
| Ctrl+Z | Undo |
| Ctrl+Shift+Z | Redo |
| Ctrl+X | Cut |
| Ctrl+C | Copy |
| Ctrl+V | Paste |
| Ctrl+A | Select all |
| Ctrl+Shift+C | Copy LaTeX |
| Ctrl+Shift+V | Smart paste — works out the format of the clipboard contents by itself (LaTeX, AsciiMath, MathML, OMML, wiki, plain text) and pastes accordingly |
| Shift+Enter | Turn typed TeX into math. Works only when there is TeX text to convert on the canvas; otherwise it falls through to a line break |
| Ctrl+Enter | "Apply" in the LaTeX edit box (while view LaTeX is open) |
13.3 Building equations — template shortcuts
Insert structures without taking your hands off the keyboard. After inserting, the cursor sits in the first empty slot. If something is selected, it goes inside the structure.
| Shortcut | Inserts | Result |
|---|---|---|
| Ctrl+F | Fraction | \frac{▯}{▯} |
| Ctrl+R | Square root | \sqrt{▯} |
| Ctrl+Shift+R | nth root | \sqrt[▯]{▯} |
| Ctrl+H | Superscript | ^{▯} |
| Ctrl+L | Subscript | _{▯} |
| Ctrl+J | Sub- and superscript | _{▯}^{▯} |
| Ctrl+I | Integral | \int_{▯}^{▯}▯\,dx |
| Ctrl+Shift+S | Sum | \sum\limits_{▯}^{▯}▯ |
| Ctrl+9 | Parentheses | \left(▯\right) |
| Ctrl+0 | Square brackets | \left[▯\right] |
| Ctrl+Shift+9 | Braces | \left\{▯\right\} |
| Ctrl+' | Prime | ▯' |
| Ctrl+Shift+' | Double prime | ▯'' |
| Ctrl+M | Matrix wizard | You choose the rows, columns and bracket type |
∑ stacked in the "Korean notation" palette or
Ctrl+T → S; for creating a clip, use F2.
13.4 Format · size
| Shortcut | What it does |
|---|---|
| Ctrl+B | Bold |
| Ctrl+Shift+I | Italic |
| Ctrl+. | Font size up 1 pt |
| Ctrl+, | Font size down 1 pt |
| Ctrl+Shift+. | Font size up 0.1 pt |
| Ctrl+Shift+, | Font size down 0.1 pt |
| Ctrl+Alt+5 | Size dialog (type a value 1.0–127.0 pt · units pt/mm/inch/%) |
13.5 View
| Shortcut | What it does |
|---|---|
| Ctrl+Y | Show control characters on/off |
| Ctrl+Shift+Y | Show the input-box hierarchy |
| Ctrl+Alt+Y | Show the main baseline — for checking vertical alignment by eye |
| Ctrl+D | Redraw |
| Menu "View" | Zoom in / zoom out / actual size (the operating system's standard keys) |
The remaining view items — boundaries, sub-baselines, center line, empty input boxes, precision-nudged parts and so on — are switched on and off under menu "View > view settings".
13.6 Other
| Shortcut | What it does |
|---|---|
| Ctrl+/ | Palette search — find a symbol by name, choose with ↑↓ and insert with Enter |
| F2 | Create clip — saves the selection if there is one, otherwise the whole equation |
| Ctrl+E | Open Preferences (the style set group is at the top) |
| Ctrl+; | Open Preferences |
| Alt+T | Read aloud — reads only the selection if there is one |
| Ctrl+Alt+↑ ↓ ← → | Precision nudge — moves the selected part by the nudge step (default 0.5 pt) |
| Tab | Go to the next slot. With Eastern chosen in Preferences, the denominator comes first inside a fraction |
| Esc | Cancel a two-step shortcut (when you change your mind after the first key) |
13.7 Two-step shortcuts
The first key chooses the family; the key you press next chooses the item. Pressing the first key brings up the assignment table at the bottom of the screen, so there is nothing to memorize. Esc cancels, and pressing a key with no assignment inserts nothing and tells you so.
| First key | Family | Then press | Items |
|---|---|---|---|
| Ctrl+G | Greek letters | A letter (with Shift = capital) | 26 |
| Ctrl+K | Symbols | A key | 28 |
| Ctrl+T | Korean textbook notation | A key | 13 |
Ctrl+G — 26 Greek letters
Lowercase as is; capitals with Shift. For letters that have no capital form here, Shift still gives the lowercase letter.
| Key | Lowercase | Shift (capital) | Name |
|---|---|---|---|
| A | α | — | \alpha |
| B | β | — | \beta |
| G | γ | Γ | \gamma / \Gamma |
| D | δ | Δ | \delta / \Delta |
| E | ε | — | \epsilon |
| V | ε | — | \varepsilon (the other form of epsilon) |
| Z | ζ | — | \zeta |
| H | η | — | \eta |
| Q | θ | Θ | \theta / \Theta |
| I | ι | — | \iota |
| K | κ | — | \kappa |
| L | λ | Λ | \lambda / \Lambda |
| M | μ | — | \mu |
| N | ν | — | \nu |
| X | ξ | Ξ | \xi / \Xi |
| O | ο | — | \omicron |
| P | π | Π | \pi / \Pi |
| R | ρ | — | \rho |
| S | σ | Σ | \sigma / \Sigma |
| T | τ | — | \tau |
| U | υ | Υ | \upsilon / \Upsilon |
| F | φ | Φ | \phi / \Phi |
| J | φ | — | \varphi (the other form of phi) |
| C | χ | — | \chi |
| Y | ψ | Ψ | \psi / \Psi |
| W | ω | Ω | \omega / \Omega |
The keys with a capital form are G D Q L X P S U F Y W — 11 in all. A space is added after each Greek letter so that it does not run into the next character.
Ctrl+K — 28 symbols
The assignments default to Korean textbook notation. Parallel is available in both forms, the international ∥ and the Korean //, on separate keys.
| Key | Symbol | Meaning | Command |
|---|---|---|---|
| , | ≤ | Less than or equal | \le |
| . | ≥ | Greater than or equal | \ge |
| / | ≠ | Not equal | \ne |
| = | ≡ | Congruent (Korean notation) | \equiv |
| S | ∽ | Similar (Korean notation) | \backsim |
| P | ± | Plus-minus | \pm |
| M | ∓ | Minus-plus | \mp |
| T | × | Times | \times |
| D | ÷ | Divide | \div |
| E | ∈ | Element of | \in |
| U | ∪ | Union | \cup |
| I | ∩ | Intersection | \cap |
| C | ⊂ | Subset | \subset |
| R | → | Arrow | \to |
| A | ↑ | Up arrow | \uparrow |
| O | ∂ | Partial derivative | \partial |
| N | ∞ | Infinity | \infty |
| L | ∥ | Parallel (international notation) | \parallel |
| K | // | Parallel (Korean notation) | \mathbin{/\!/} |
| V | ⊥ | Perpendicular | \perp |
| G | ∠ | Angle | \angle |
| H | △ | Triangle | \triangle |
| 3 | ∴ | Therefore | \therefore |
| 4 | ∵ | Because | \because |
| 8 | · | Middle dot (vector dot product) | \cdot |
| 0 | ° | Degree | ^{\circ} |
| ; | ⋯ | Dots | \cdots |
| ' | ′ | Prime | \prime |
Ctrl+T — 13 Korean textbook notation structures
Structures that are tedious to build by hand are inserted complete with their empty slots. After inserting, move between the slots with Tab and fill them in.
| Key | Inserts | Result |
|---|---|---|
| P | Permutation ₙPᵣ | {}_{▯}\mathrm{P}_{▯} |
| C | Combination ₙCᵣ | {}_{▯}\mathrm{C}_{▯} |
| H | Combination with repetition ₙHᵣ | {}_{▯}\mathrm{H}_{▯} |
| D | Repeating decimal | 0.\dot{▯}\dot{▯} |
| A | Sequence | \{a_{▯}\} |
| V | Vector | \overrightarrow{▯} |
| L | Line segment | \overline{\mathrm{▯}} |
| R | Line | \overleftrightarrow{\mathrm{▯}} |
| O | Arc | \overset{\frown}{\mathrm{▯}} |
| S | Sum (limits stacked) | \sum\limits_{▯}^{▯} |
| M | Limit (condition below) | \lim\limits_{▯ \to ▯} |
| T | Hangul proviso | \quad \text{(단, ▯)} |
| F | Korean fraction | \dfrac{\text{▯}}{\text{▯}} |
13.8 Assigning shortcuts on the InDesign side
The MyMath plugin registers two commands with InDesign. Assign the keys you like to them in InDesign's keyboard shortcuts dialog, and you can open the editor from the keyboard alone, without clicking the panel button.
| Command name | What it does |
|---|---|
| New Equation | Opens the editor to build a new equation |
| Edit Selected Equation | Loads the selected equation into the editor for re-editing |
- Open Edit > Keyboard Shortcuts in InDesign.
- The "Default" set cannot be changed directly, so make a copy with [New Set].
- Under Product Area choose the plugins group, and find New Equation or Edit Selected Equation in the list.
- Click in the "New Shortcut" box and press the key you want (if another command already uses it, its name is shown just below).
- Save with [Assign] → [OK].
1/2, x^2, sqrt(2) and the like in the panel's quick-insert box
and press Enter: it goes straight in at the cursor.
14. Troubleshooting
Install and connection
| Symptom | Fix |
|---|---|
| [Plugins] → MyMath is missing from the InDesign menu | ① Check that InDesign is 18.5 or later (Help → About InDesign) ② Quit InDesign completely and start it again ③ If the installer said the plugin could not be added, run the installer once more |
| A permission request appears when I click [Edit Equation] | That is normal. Tick [Remember my choice] and click [Allow] — you only do this once (2.3) |
| [Edit Equation] does not open the editor window | You may have clicked [Block] in the permission request. Start MyMath Editor from the desktop yourself and the panel connects straight away. Keeping the editor open while you work is also the fastest way |
| The panel says the exchange folder is not set | Normally it connects by itself. The reason for the failure is shown after the message; check it, then use Folder [Change] under "Connection settings" in the panel
to pick Documents\MyMath\exchange once. It won't ask again |
Placing equations
| Symptom | Fix |
|---|---|
| Body text vanished from the screen after placing an equation | Click [Redraw view] in the panel's "Document" section. It recomposes the text and redraws the screen. (The text was never deleted; it is a screen refresh problem) |
| The equation landed on the page by itself instead of inside the line | Check that the text cursor was in the text before placing. With no cursor, the equation is placed on the page |
| I used quick insert but the editor opened with a note about an "empty slot" | The equation has an unfilled slot (⬚). Fill it in the editor, then [Id InDesign] |
| The equation sits too high or too low in the line | Select the equation and adjust it with [▲][▼] under "Vertical offset" in the panel. [0] puts it back |
| Only the lines with equations have wider leading | A tall equation has increased the line height. Set the paragraph's leading to a fixed value and the page comes out even |
Batch operations
| Symptom | Fix |
|---|---|
| The $…$ conversion finds nothing | ① If the scope is "selected frame" and there is no cursor, you only get a hint — put the cursor in, or switch to "whole document" ② Check that each $ has its partner on the same line |
| [Re-render all equations] says no equations were found | Check with [Count equations] first. If it says 0, this document has no MyMath equations |
| A batch operation never finishes | Check that the editor window is open. If there is no response for 10 minutes, the operation stops automatically |
| The equation list does not show in the editor | Scroll down the editor's sidebar to the "document equations" section. The list appears automatically when you click [Send list to editor] in the panel |
The editor
| Symptom | Fix |
|---|---|
| The editor closed suddenly | Open it again and a bar appears saying "The previous edit ended abruptly". Click [restore] |
| Two editors open | They don't. If one is already open, that window comes to the front |
| I see red text in the equation | It marks a mistake in the equation's syntax. Delete that part and build it again, or check the source with [view LaTeX] in the ribbon |
| Hangul looks broken inside an equation | Try another font under Preferences → "Korean font for text in equations" |
Output
| Symptom | Fix |
|---|---|
| Equations look heavy and clotted in the PDF | Check whether "print color" in Preferences is set to RGB. For print, K100 is the default |
| The printer asks for the fonts | Equations use no fonts. Send the body text fonts only |
| A link warning appears when I reopen the document | Equations are inside the document and have no links. It may be a link problem with some other image |
If it still doesn't work — the log files
The panel keeps its own record of its start-up steps and errors. Send these files along when you ask for help and the cause can be found right away.
Send them to: uibsee@hanmail.net or GitHub Issues
| File | Location |
|---|---|
panel-boot.log | The PluginData folder under %APPDATA%\Adobe\UXP\PluginsStorage\IDSN(paste the first part into the address bar of File Explorer and browse from there) |
autoconnect-diag.json |
15. What it cannot do — honestly
InDesign does not open certain features to plugins, so the following are impossible in principle. We have provided another way to get there instead.
| Not possible | Use this instead |
|---|---|
| Double-clicking an equation to edit it | Click the equation → [Edit Equation] in the panel (one extra click) |
| Adding a button to the InDesign toolbar | The large [Edit Equation] button in the panel |
| Adding items to the equation's right-click menu | In InDesign, [Edit → Keyboard Shortcuts] lets you assign your own shortcuts to the MyMath commands |
Frequently asked questions
Does it work on a Mac?
The editor is prepared so that it can be built for Mac, but this has not been built or verified yet. For now only Windows is confirmed.
What if a document with equations is opened on a computer without MyMath?
Equations are inside the document as vectors, so they display and print as they are. To edit an equation on that computer, however, MyMath must be installed.
Can several people work on the same document?
Yes. To keep typesetting consistent, pass around a style set file; to share frequently used snippets, pass around the clips folder.
Where is the equation source stored?
As plain LaTeX text in the label of each equation frame. With the document file alone you can always recover the source, and no sidecar files are created.
Appendix. The complete palette list
The palette has 28 families · 646 items.
Click a family button in the ribbon and the items of that family open on one screen
(the basic items and the "more" items appear together).
Hover over a button and the number of items is shown, as in Greek (43 items).
A.1 The families at a glance
| # | Family | Icon | Basic | More | Total | Typical items |
|---|---|---|---|---|---|---|
| 1 | Korean notation | 한 | 12 | 20 | 32 | ₙPᵣ · ₙCᵣ · repeating decimal · {aₙ} · ∽ similar · ≡ congruent · // parallel · →AB vector |
| 2 | Fraction | ─ | 11 | 6 | 17 | a/b · display fraction · small fraction · slashed · continued fraction · binomial coefficient · mixed number |
| 3 | Radical | √ | 4 | 0 | 4 | √x · ⁿ√x · ³√x · ⁴√x |
| 4 | Script | x² | 12 | 5 | 17 | x² · x₂ · both · prescript · prime · evaluation bar · substack |
| 5 | Delimiters | (·) | 8 | 8 | 16 | ( ) [ ] { } · absolute value · norm · angle brackets · floor · ceiling · \big~\Bigg |
| 6 | Integral | ∫ | 24 | 0 | 24 | ∫ · ∫ₐᵇ · ∬ · ∭ · ⨌ · ∮ · ∯ · ∰ · dx · dV · dA · ds |
| 7 | Sum | ∑ | 8 | 0 | 8 | ∑ · ∑ᵢ₌₁ⁿ · ∑ₙ₌₀^∞ · double sum · multiple conditions |
| 8 | Product | ∏ | 11 | 0 | 11 | ∏ · ∐ · ⋃ · ⋂ · ⨁ · ⨂ · ⨀ |
| 9 | Limit | lim | 11 | 0 | 11 | x→a · x→0 · x→∞ · one-sided limits · limsup · liminf · sup · inf |
| 10 | Derivative | d/dx | 11 | 0 | 11 | df/dx · d²f/dx² · d/dx · ḟ · f̈ · f' · f⁽ⁿ⁾ |
| 11 | Partial derivative | ∂ | 13 | 0 | 13 | ∂f/∂x · second-order and mixed partials · ∇ · ∇² · ∇· · ∇× · Δ |
| 12 | Matrix (wizard) | ⎡⎤ | 14 | 0 | 14 | 2×2–5×5 · square brackets · determinant · cases · aligned equations · row and column vectors · augmented matrix |
| 13 | Function | sin | 8 | 27 | 35 | sin cos tan · log ln exp · inverse trigonometric · hyperbolic · det dim ker gcd mod |
| 14 | Accents | x̂ | 12 | 25 | 37 | x̂ · x̄ · x̃ · ẋ · →x vector · overbrace · cancel strokes · 8 typefaces · \text |
| 15 | Greek | α | 11 | 32 | 43 | 24 lowercase · 11 capitals · ℵ · ℶ |
| 16 | Relation | ≤ | 13 | 24 | 37 | ≤ ≥ ≠ ≈ · ≡ congruent · ∽ similar · // parallel · ⊥ perpendicular · ∝ · ≪ ≫ |
| 17 | Operator | ± | 10 | 18 | 28 | ± ∓ × ÷ · ∗ ⊕ ⊗ ∘ • · ⊞ ⊟ ⊠ · ∧ ∨ ¬ |
| 18 | Arrow | → | 12 | 18 | 30 | → ← ↑ ↓ ↔ ⇒ ⇐ ⇔ ↦ · labeled arrows · long arrows · diagonals |
| 19 | Sets/logic | ∈ | 12 | 30 | 42 | ∈ ∉ ⊂ ⊃ ∪ ∩ ∅ ∀ ∃ · ∴ ∵ · ℝ ℕ ℤ ℚ ℂ · ∧ ∨ ¬ ⇒ ⇔ |
| 20 | Other | ∞ | 12 | 28 | 40 | ∞ ∂ ∇ ℏ ℓ ℘ · ° ′ · … ⋯ ⋮ ⋱ · ♭ ♯ · † ‡ · currency and card-suit symbols |
| 21 | Frame | ▢ | 7 | 0 | 7 | \boxed · \fbox · \framebox · color box · ∎ end of proof |
| 22 | Space | ␣ | 13 | 0 | 13 | \, \: \; \! · \quad \qquad · \hspace \vspace · 2 dashes |
| 23 | Shape | △ | 12 | 9 | 21 | △ ▲ ▽ ▼ ◁ ▷ · ○ ● □ ■ ◇ ◆ · ∠ ∢ ∡ · ⌒ ⌣ |
| 24 | Digit | ½ | 11 | 20 | 31 | ½ ⅓ ⅔ ¼ ¾ ⅕ ⅙ ⅛ ⅜ ⅝ ⅞ · superscript 0–9 · subscript 0–9 |
| 25 | Align · equations | ≡ | 12 | 17 | 29 | align · gather · cases · split · line break · alignment marker · \hline · \displaystyle |
| 26 | Template | 📋 | 12 | 36 | 48 | quadratic formula · Pythagoras · definition of the derivative · normal distribution · 4 kinds of column arithmetic · chemical formulas · units |
| Font Aa | 10 | 8 | 18 | italic · upright · bold · bold italic · sans serif · monospace · blackboard bold · script · fraktur · Korean text · ℕℤℚℝℂ · smaller · larger | ||
| Color 🎨 | 7 | 2 | 9 | red · blue · green · orange · purple · gray · black · yellow background · bordered box | ||
| Total | 313 | 333 | 646 | |||
A.2 "Korean notation" — all 32 items
This family is collected from the <Terms and Symbols> lists of the Korean Ministry of Education notice [Annex 8] Mathematics Curriculum. It gathers in one place the notations that differ from international practice or are hard to build by hand. You will find it in the first group of the ribbon's top row, "Korean textbook".
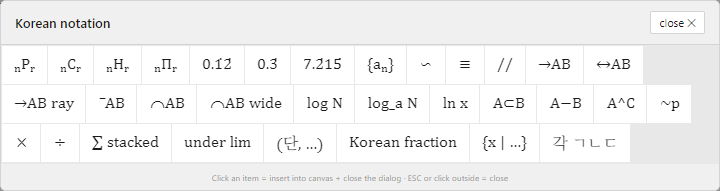
| Item | LaTeX | Description |
|---|---|---|
| ₙPᵣ | {}_{n}\mathrm{P}_{r} | Permutation — the P is upright |
| ₙCᵣ | {}_{n}\mathrm{C}_{r} | Combination |
| ₙHᵣ | {}_{n}\mathrm{H}_{r} | Combination with repetition |
| ₙΠᵣ | {}_{n}\Pi_{r} | Permutation with repetition |
| 0.1̇2̇ | 0.\dot{ }\dot{ } | Repeating decimal — two digits |
| 0.3̇ | 0.\dot{ } | Repeating decimal — one digit |
| 7.2̇15̇ | \dot{ }{ }\dot{ } | Repeating decimal — three digits or more. Dots go on the first and last digits only; the middle is left bare |
| {aₙ} | \{a_{n}\} | Sequence — an item because braces typed as is simply disappear |
| ∽ | \backsim | Similar. \sim (∼) is a different character, mirrored left to right |
| ≡ | \equiv | Congruent — where Korea parts from the international ≅ |
| // | \mathbin{/\!/} | Parallel — printed as two slashes |
| →AB | \overrightarrow{ } | Vector — a long arrow covering all the letters |
| ↔AB | \overleftrightarrow{\mathrm{ }} | Line |
| →AB ray | \overrightarrow{\mathrm{ }} | Ray |
| ‾AB | \overline{\mathrm{ }} | Line segment |
| ⌒AB | \overset{\frown}{\mathrm{ }} | Arc — a small ⌒, closer to the textbook look |
| ⌒AB wide | \overparen{\mathrm{ }} | Arc — a wide arch |
| log N | \log | Common logarithm — omitting the base is the formal style |
| log_a N | \log_{a} | General logarithm |
| ln x | \ln | Natural logarithm — not log_e |
| A⊂B | \subset | Subset — ⊆ is not in the list |
| A−B | - | Set difference — not \setminus |
| A^C | ^{C} | Complement — a capital C |
| ~p | \sim | Negation — not \neg |
| × | \times | Multiplication — × rather than · even in high school |
| ÷ | \div | Division |
| ∑ stacked | \sum\limits_{ }^{ } | Sum — limits above and below even inline |
| under lim | \lim\limits_{ \to } | Limit — the condition below even inline |
| (단, …) | \quad \text{(단, )} | A proviso in Korean ("provided that…") |
| Korean fraction | \dfrac{\text{ }}{\text{ }} | The (natural number)÷(natural number) form |
| {x | …} | \{ \mid \text{} \} | Set-builder notation |
| 각 ㄱㄴㄷ | \text{각 } | Elementary school — vertices named with Korean consonants, a notation that does not use the ∠ sign |
∽ (similar, \backsim) and ∼ (\sim) are two different characters, mirrored left to right.
The "relation" family contains both, and each item's name says which one it is.
The same goes for ≡ and ≅, and for // and ∥.


A.3 "Greek" — 43 items
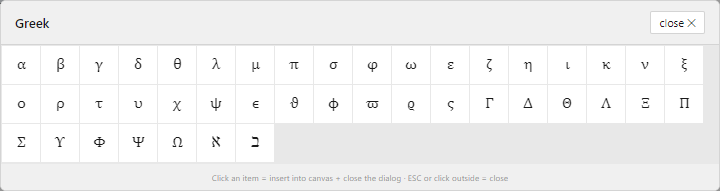
| Group | Count | Items |
|---|---|---|
| Lowercase (basic) | 11 | α β γ δ θ λ μ π σ φ ω |
| Lowercase (more) | 19 | ε ζ η ι κ ν ξ ο ρ τ υ χ ψ ϵ ϑ ϕ ϖ ϱ ς |
| Capitals | 11 | Γ Δ Θ Λ Ξ Π Σ Υ Φ Ψ Ω |
| Hebrew letters | 2 | ℵ ℶ |
With Ctrl+G followed by a letter you can insert 26 of them directly — A→α, B→β, G→γ, D→δ, Q→θ, L→λ, M→μ, P→π, S→σ, F→φ, W→ω. Hold Shift as well for the capital (Γ Δ Θ Λ Ξ Π Σ Υ Φ Ψ Ω).
A.4 "Relation" — 37 items
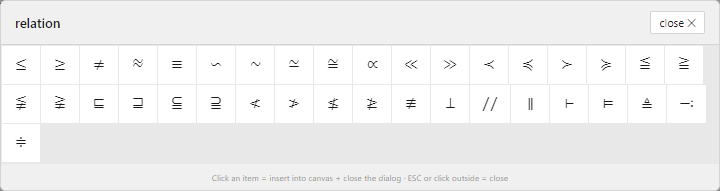
| Group | Items |
|---|---|
| Inequalities · equalities | ≤ ≥ ≠ ≈ ≃ ≑ ≪ ≫ ≦ ≧ ≨ ≩ ≮ ≯ ≰ ≱ ≢ |
| Similar · congruent | ∽ (Korean) · ∼ · ≡ (Korean) · ≅ (international) |
| Parallel · perpendicular | // (Korean) · ∥ (international) · ⊥ |
| Order relations | ≺ ≼ ≻ ≽ ⊑ ⊒ ⫅ ⫆ |
| Other | ∝ ⊢ ⊨ ≜ ∹ |
A.5 "Arrow" — 30 items
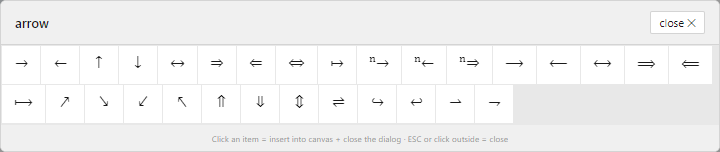
| Group | Items |
|---|---|
| Basic | → ← ↑ ↓ ↔ ⇒ ⇐ ⇔ ↦ |
| Labeled | \xrightarrow{ } · \xleftarrow{ } · \xRightarrow{ }
— text sits on top of the arrow |
| Long arrows | ⟶ ⟵ ⟷ ⟹ ⟸ ⟼ |
| Diagonals | ↗ ↘ ↙ ↖ |
| Double · hooks · harpoons | ⇑ ⇓ ⇕ ⇌ ↪ ↩ ⇀ ⇁ |
A.6 "Shape" — 21 items
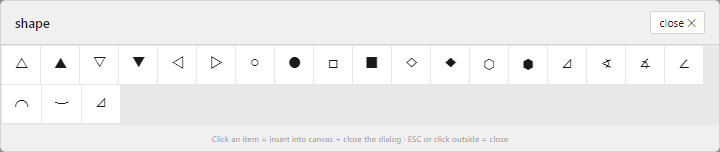
| Group | Items |
|---|---|
| Triangles | △ ▲ ▽ ▼ ◁ ▷ ⊿ |
| Circles · squares · diamonds | ○ ● □ ■ ◇ ◆ ⬡ ⬢ |
| Angles | ∠ ∢ ∡ |
| Arcs | ⌒ ⌣ |
A.7 "Template" — 48 items
This family holds complete, ready-made equations. It is in the "Format" group of the ribbon's bottom row.
| Group | Count | Items |
|---|---|---|
| Basic (shown right away) | 12 | Quadratic formula · Pythagoras · definition of the derivative · fundamental theorem of calculus · Gaussian integral · Euler's identity · Bayes' theorem · mean · variance · standard deviation · trigonometric identity · law of cosines |
| Series · transforms | 4 | Taylor · Maclaurin · Fourier transform · Laplace transform |
| Linear algebra | 7 | Cauchy–Schwarz · triangle inequality · determinant 2×2 and 3×3 · matrix product · dot product · cross product |
| Complex numbers | 2 | Euler's formula · De Moivre |
| Physics | 8 | Schrödinger · Maxwell's 4 equations · E=mc² · F=ma · universal gravitation · Coulomb · ideal gas · entropy |
| Probability | 3 | Normal distribution · binomial distribution · expected value |
| Elementary column arithmetic | 5 | Long division · column addition · column subtraction · column multiplication · \enclose{longdiv} |
| Chemistry · units | 7 | H₂O · CO₂ · reaction · balanced reaction · °C · m/s² · kg·m/s² |
A.8 "Space" — 13 items for touching up spacing
| Item | Width | Where it is used |
|---|---|---|
\, | 3/18 em | The one used most — before dx and the like |
\: | 4/18 em | Medium |
\; | 5/18 em | Wide |
\! | −3/18 em | Negative — for pulling things together |
\quad | 1 em | Between an equation and its proviso |
\qquad | 2 em | Very wide |
\ · ~ · \enspace | — | Normal space · non-breaking space · en width |
\hspace · \vspace | As given | Type the pt value yourself |
| — · – | — | Em dash · en dash |
📄 Download this manual as a PDF — for printing or offline reading